We’ve identified eight critical warning signs that your exterior paint is failing: peeling or blistering surfaces indicating moisture infiltration, chalky residue from UV-degraded binders, alligatoring cracks from incompatible paint layers, separated caulk creating water entry points, fading that signals protective barrier breakdown, mold growth in moisture-prone areas, soft wood spots revealing hidden rot, and rust staining around fasteners. These failures rarely occur in isolation—they’re interconnected symptoms of compromised paint systems that demand systematic assessment. Below, we’ll examine each indicator’s underlying causes and the specific repair protocols required to restore your home’s protective envelope.
Key Takeaways
- Peeling or blistering paint indicates moisture infiltration through leaks, poor ventilation, or compromised surfaces requiring immediate attention.
- Cracking and alligatoring patterns reveal incompatible paint layers, excessive buildup, or natural aging from UV exposure and temperature cycles.
- Fading and chalking show UV radiation has degraded pigments and binders, creating powdery residue and uneven color patches.
- Failed caulk around windows and doors allows water penetration, causing rust stains, discoloration, and hidden moisture damage.
- Dark streaks, swelling wood, soft spots, and musty odors signal active water intrusion and potential mold or rot development.
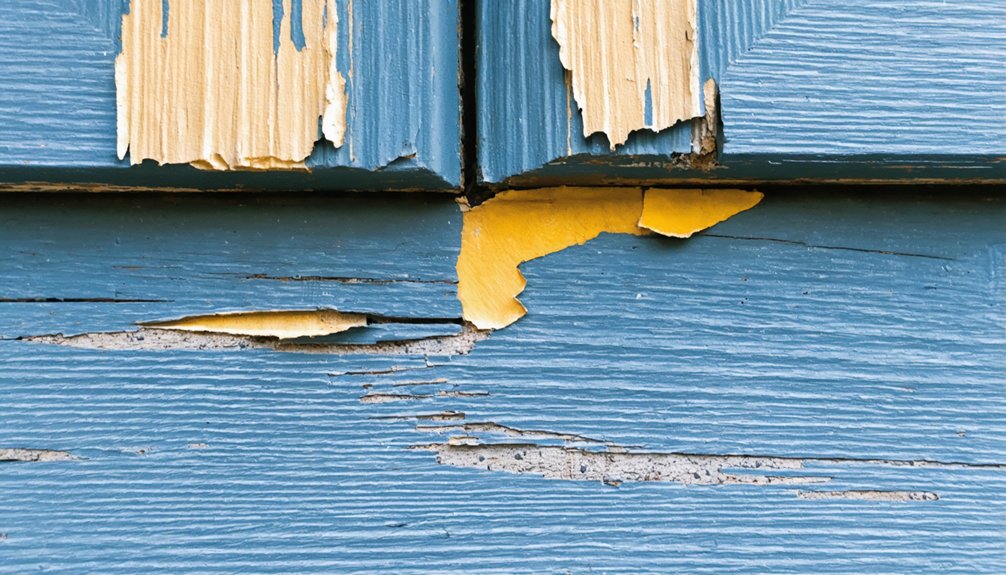
Peeling and Blistering Paint
When moisture infiltrates exterior walls through leaks, poor ventilation, or high humidity, it creates the primary condition for paint failure. We’ll notice blistering when trapped moisture behind paint transforms into steam under heat, forcing the film to separate from the substrate.
Moisture condensation issues worsen when surfaces absorb water through masonry or structural gaps, building pressure until the coating lifts away.
Peeling occurs when we’ve applied new layers over compromised surfaces without addressing underlying moisture problems. Metal and aluminum surfaces prove particularly vulnerable during temperature extremes.
We must recognize that flaking paint indicates either inadequate surface preparation or active water infiltration. These visible failures signal deeper structural concerns requiring immediate intervention to prevent extensive damage.
Fading and Chalking on Exterior Surfaces
When UV radiation penetrates your paint film, it triggers photochemical reactions that degrade pigment molecules and oxidize the binder resins holding them in place.
We can identify this deterioration through two primary indicators: color washout where pigments lose their ability to reflect light at intended wavelengths, and chalking—a powdery residue that appears when you run your hand along the surface.
Uneven fading patterns across your siding reveal accelerated damage in high-exposure zones, signaling that the protective barrier has begun to fail.
Sunlight Breaks Down Pigments
Ultraviolet radiation initiates a photodegradation process that systematically breaks down the molecular structure of exterior paint pigments. Through photolysis, UV radiation absorption weakens chemical bonds within pigment molecules, causing the dull, chalky appearance we’ve all noticed on aging exteriors. Darker hues deteriorate faster because they absorb more UV energy, accelerating molecular breakdown.
Thermal expansion and contraction compound this damage. As surfaces heat and cool, paint films experience repetitive stress cycles that create microcracks, exposing more pigment to degradation. South- and west-facing walls receive the most intense solar exposure, showing accelerated failure patterns.
We recommend UV-resistant acrylic formulations with fade-inhibiting additives for maximum protection. Lighter colors naturally reflect more sunlight, extending service life. Premium elastomeric coatings provide the flexibility needed to withstand thermal cycling while maintaining pigment integrity.
Powdery Residue Indicates Deterioration
UV damage doesn’t stop at molecular breakdown—it manifests as visible powdery residue on your paint surface. This chalking occurs when the binder degrades, releasing pigment particles that create a distinctive white powder. We’re not dealing with dust or mold—it’s the paint itself breaking down.
Oil-based formulations and budget products with high pigment loads chalk most aggressively. When moisture seeps behind compromised coatings, it accelerates deterioration and triggers extensive chalking, particularly around high-humidity zones like kitchens and bathrooms.
Restoring chalked surfaces requires thorough power washing to remove all residue before applying new sealer. We recommend high-quality exterior acrylic coatings engineered for UV resistance. Proper surface preparation, including primer on porous substrates, prevents premature recurrence and guarantees lasting protection against environmental degradation.
Uneven Color Shows Damage
Color inconsistencies across your home’s facade signal progressive paint failure that demands immediate attention. We’re seeing uneven fading patterns where southern and western exposures show significant premature discoloration while protected eaves maintain original vibrancy. This disparity reveals UV-induced binder breakdown and pigment degradation occurring at different rates.
Inconsistent paint coverage becomes particularly evident on surfaces experiencing variable sun exposure throughout the day. We’ll notice dark colors fading to lighter shades on sunny walls while shaded sections retain depth. Coastal and high-altitude properties face accelerated deterioration from UV index 8–12 conditions.
These uneven color patterns indicate compromised surface protection. When we observe patchwork fading alongside hidden areas remaining intact, it’s time for professional assessment. Addressing these inconsistencies prevents substrate damage and restores uniform appearance.
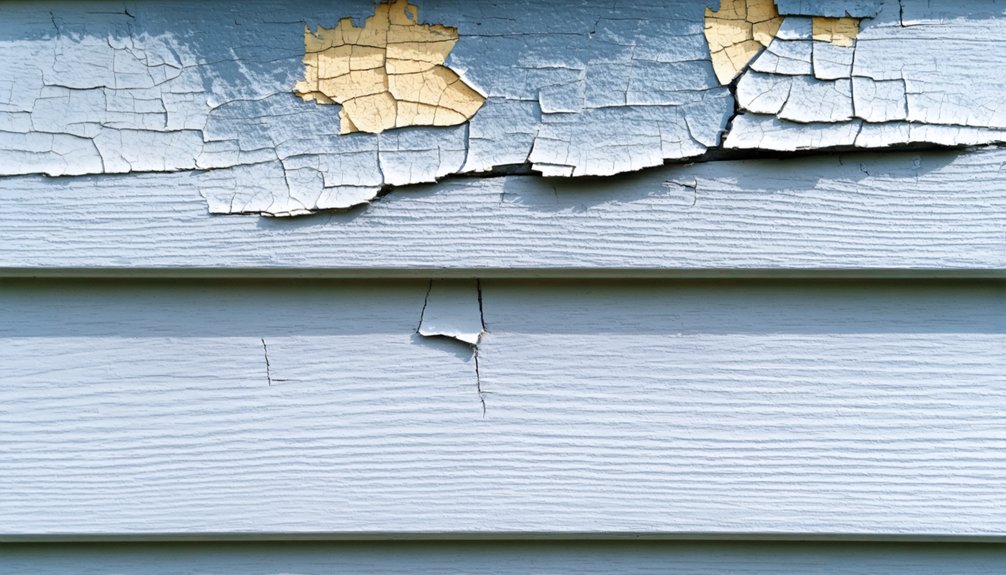
Cracking and Alligatoring Patterns
When paint film develops a distinctive network of cracks resembling alligator scales, we’re dealing with one of the most recognizable forms of exterior paint failure. This condition typically stems from incompatible paint layers—applying rigid alkyd topcoats over flexible undercoats creates stress points as temperatures fluctuate. We’ll also see this from paint film thickness variations caused by excessive build-up without proper removal, or inadequate surface preparation before reapplication.
The progression starts as fine checking, then advances into deeper, irregular patterns across siding and trim. Natural aging of oil-based paints accelerates this deterioration through repeated freeze-thaw cycles and UV exposure.
Our solution requires complete removal of compromised layers, thorough priming, and top-quality exterior latex paint. We must guarantee each coat dries fully to prevent recurrence.
Caulk Failure and Moisture Intrusion
We’ve found that caulk failure creates the most insidious paint problems because moisture intrusion begins long before visible surface damage appears. When we inspect exterior caulk joints—particularly at trim-to-siding changeovers, window perimeters, and miter joints—cracked or separated material provides direct pathways for water to penetrate behind your paint film.
Our systematic examination includes probing suspect areas with an awl to detect soft spots, checking for discoloration patterns that indicate hidden moisture migration, and identifying rust staining around fasteners that signals advanced water damage to substrates.
Identifying Cracked Caulk Locations
Cracked caulk announces itself through several distinct visual markers that demand immediate attention. We’ll find the most critical failures around windows and door frames, where gaps permit water entry behind your paint system.
Trim edges pulling away from siding reveal classic adhesion breakdown, while fascia boards and crown molding joints display stress cracks from wood movement.
During inspections, we’re checking for hairline fissures in high-movement areas and running our fingers along joints to detect separations. Caulk discoloration patterns often indicate underlying moisture problems before paint damage becomes visible. When we press brittle caulk and it doesn’t flex, failure is imminent.
Proper caulk repair techniques require complete removal of failed material, surface priming, and selecting appropriate acrylic or siliconized products that accommodate substrate movement while maintaining weatherproof seals.
Water Damage Warning Signs
How does water infiltration manifest through failing caulk and compromised paint systems? We’ll notice peeling or blistering paint around windows and trim where moisture enters through gaps. These bubbles form when water traps beneath the surface, heated by sun exposure.
Dark streaks and discoloration mark absorption points, often accompanied by black patches indicating mold colonization. When we press suspect areas, swelling wood siding reveals hidden saturation—soft spots that compress inward signal early damage before visible rot develops.
A musty odor presence confirms ongoing intrusion through exterior breaches, particularly where caulk has failed. Water pushes paint away from substrates, exposing underlying surfaces to accelerated deterioration.
These interconnected symptoms—peeling, blistering, staining, and softness—require immediate assessment to prevent structural compromise and further moisture penetration.
Hidden Rot Detection Methods
Before water damage becomes visible on the surface, we can detect hidden deterioration by probing beneath failing paint systems and compromised caulk joints. We’ll use three essential detection methods to identify problems before they compromise structural integrity:
- Screwdriver Poke Test: Probe suspicious areas around window sills and trim. Soft, spongy wood or hollow sounds indicate active decay.
- Moisture Meter Interpretation: Scan behind peeling paint and under frames. Higher readings than surrounding areas reveal fungal problems, even when surfaces appear dry.
- Fungal Growth Identification: Check crawl spaces, north-facing walls, and areas under eaves where dormant spores reactivate with moisture cycles.
Focus our inspections on vulnerable zones: windowsills, door frames, lower siding, and shaded walls. Early detection through systematic testing prevents minor deterioration from escalating into costly structural repairs.
Mold, Mildew, and Wood Rot Development

When moisture penetrates exterior paint, it creates an environment where mold, mildew, and wood rot can rapidly compromise your home’s structural integrity. We’ll identify these threats through specific indicators. Dark discoloration that bleaches with household bleach confirms mildew rather than dirt accumulation. Watch for water retention patterns around faulty gutters, sagging downspouts, and dense shrubbery trapping moisture against siding. Black mold on beams signals extended moisture exposure—conditions attracting fungal growth and the presence of termites.
Paint blistering, cracking, or swelling often conceals advancing rot beneath. We recognize wet rot in constantly damp areas developing slowly but destructively. Dry rot spreads aggressively through wood even in low-moisture zones. Porous latex paints over linseed oil primers prove especially vulnerable in warm, humid climates. Address compromised surfaces immediately—mold penetrates substrates while mildew remains superficial.
When to Consider Touch-Ups vs. Full Repaint
Determining whether your exterior requires spot repairs or complete recocoating depends on evaluating damage patterns, substrate condition, and long-term cost efficiency. We recommend touch up application techniques when addressing isolated chips near walkways or window trim, provided your original paint remains stable without widespread deterioration.
Spot repairs work for isolated damage under 10%, but widespread deterioration demands complete recoating for maximum protection and value.
However, peeling, chalking, or bare wood exposure signals complete system failure requiring full intervention.
Our cost benefit analysis of repainting considers:
- Surface Coverage: Isolated damage under 10% justifies localized repairs; widespread issues demand inclusive treatment
- Color Matching Viability: South-facing walls show noticeable fading within one year, making seamless blending nearly impossible
- Long-Term Investment: Multiple touch-ups across high-traffic areas often exceed full repaint costs while delivering inferior protection
We prioritize solutions that maximize your investment while ensuring lasting substrate protection.
How to Inspect Your Home’s Exterior Paint
Understanding repair scope only matters when you accurately assess your home’s current condition. We’ll walk you through the systematic inspection process that reveals hidden failures.
Start by running your fingers along sun-exposed areas and corners where trim meets siding—roughness signals paint breakdown. Check lower sections near ground level for moisture damage and peeling. Examining window frames, doorways, and shaded areas uncovers mold growth requiring treatment before repainting.
Next, focus on checking paint adhesion using tape tests on suspect areas. Evaluating surface preparation means detecting chalky residue or grit that compromises coating longevity. Step back in natural light to spot color variations and coverage gaps.
Finally, inspect metal components for rust and wood for soft spots indicating structural issues demanding immediate attention.
Understanding Elevation-Specific Paint Failure
Your home’s exterior walls face drastically different environmental conditions depending on their compass orientation and vertical position. We’ve identified distinct failure patterns that help diagnose underlying moisture issues:
- South and west elevations experience UV degradation and dark pigment blistering from intense solar heat, while accumulating chalk that prevents new paint adhesion
- North-facing walls develop mildew in shaded areas where moisture lingers without UV exposure to dry surfaces
- Lower sections and roof valleys show ice dam formation damage and sustained moisture from water runoff concentration
Wind-driven rain accelerates peeling on weather-exposed sides, while high-humidity zones near bathrooms create non seasonal damage patterns. Understanding these elevation-specific failures allows us to implement targeted surface preparation and select appropriate paint systems for each building section’s unique environmental stresses.
Frequently Asked Questions
How Long Should Quality Exterior Paint Last Before Showing Signs of Failure?
We’d love to promise eternal paint, but realistically, quality exterior paint lasts 7-15 years before failing. Paint quality factors and proper surface preparation dramatically impact longevity—your substrate choice and climate conditions determine where you’ll land in that range.
Can I Paint Over Existing Exterior Paint or Must I Strip Everything?
We can paint over existing exterior paint if the old paint condition remains sound—under 20% failure—but proper surface preparation through cleaning, deglossing, and spot-priming guarantees ideal adhesion. Extensive peeling requires stripping for long-term performance.
What Time of Year Is Best for Repainting My Home’s Exterior?
We recommend scheduling your exterior painting during late spring or early fall when seasonal weather conditions align with the suitable painting timeframe: temperatures between 50-85°F, low humidity, and minimal precipitation guarantee proper adhesion and curing for lasting results.
Does Paint Color Choice Affect How Quickly My Exterior Paint Fails?
Yes, we’ve found color choice dramatically impacts failure rates. Dark colors absorb more UV and heat, accelerating breakdown. However, paint sheen quality, paint application techniques, and premium formulations with UV inhibitors often matter more than color selection alone.
Should I Hire a Professional or Can I Repaint My Home’s Exterior Myself?
We’ll help you decide based on your DIY skill level required and budget considerations. For simple one-story homes, DIY works well. However, multi-story exteriors, extensive prep needs, or complex architecture demand professional expertise for lasting results.