We’ll start by removing all doors, drawers, and hardware, labeling each component with numbered tape for reassembly. Next, we degrease every surface using TSP substitute to eliminate cooking oils and residue that prevent paint adhesion. Then we sand with 120-grit sandpaper to create mechanical tooth on the existing finish, followed by thorough vacuuming and tack cloth wiping. Finally, we apply a bonding primer to bare wood and previously finished surfaces. The techniques we’ve outlined here represent fundamental prep work, though professional-grade results require additional surface evaluation and substrate-specific treatments.
Key Takeaways
- Remove all doors, drawers, and hardware systematically, labeling each component with numbered tape to ensure proper reassembly.
- Establish containment by laying plastic drop cloths, masking adjacent surfaces, and blocking HVAC registers to minimize dust spread.
- Deep clean all cabinet surfaces with TSP substitute or degreaser to eliminate grease, oils, and cooking residue.
- Sand all surfaces with 120-grit sandpaper to rough up existing finish and create proper paint adhesion.
- Prime all bare wood and unfinished surfaces after vacuuming and wiping with tack cloth to remove dust.
Clear and Protect Your Work Area
Before opening a single paint can, establishing proper containment separates amateur work from professional results. We’ll position our work area away from heavy traffic zones to minimize dust contamination—critical for achieving that glass-smooth finish you’re after.
Start by laying heavy-duty plastic drop cloths beneath all cabinet pieces. Elevate doors and drawers on wood strips or sawhorses to prevent fresh paint from bonding to the sheeting. Mask countertops and adjacent walls with painter’s tape and protective coverings.
For open work area ventilation, we recommend blocking HVAC registers with filters to prevent paint particles from circulating through your home. Professional contractors establish temporary negative air pressure booths using zip poles and high CFM fans, forcing clean air into the space while containing overspray. When properly sealed, plastic sheeting should balloon inward—confirming containment integrity.
Remove All Hardware, Doors, and Drawers
Before we apply a single stroke of paint, we’ll systematically remove every cabinet door, drawer front, and piece of hardware from your boxes. We’ll number each component with painter’s tape and photograph the existing layout to eliminate reinstallation guesswork.
All screws, hinges, knobs, and pulls get sorted into labeled bags or trays—proper organization now prevents hours of frustration during reassembly.
Take Off All Doors
Once you’ve assembled your tools and cleared the workspace, removing all cabinet hardware marks the critical first point in the preparation sequence. We’ll unscrew knobs and pulls with a screwdriver, using a drill for stubborn fasteners. Store all hardware in containers—this prevents loss and creates paint friendly surfaces on doors and drawer fronts.
Next, we’ll locate hinges connecting doors to cabinet frames. Support each door while removing hinge screws systematically, working from top to bottom. Keep hinges in order since they’ve worn into specific positions over years of use. This prevents sagging and misalignment during reinstallation.
Finally, separate drawer fronts from their boxes. We’ll organize all removed components by original location, ensuring wood that’s changed over time returns exactly where it came from for seamless reassembly.
Label and Organize Hardware
Every cabinet door, drawer front, and hardware piece requires a clear identification system that tracks its original location throughout the painting process. We’ll use painter’s tape to number each component sequentially, starting with cabinet 1 at the far left. This prevents reinstallation errors when multiple units share identical hardware styles.
Hardware Removal and Preparation Protocol:
- Complete Hardware Extraction – Remove every handle, knob, and hinge using a drill or screwdriver to expose all surfaces for proper prep
- Degreasing Treatment – Clean hardware with degreaser or vinegar solution to eliminate oils and residue that compromise paint adhesion
- Surface Roughening – Sand hardware with 220-grit sandpaper, then remove dust with a tack cloth
- Efficient Storage Solutions – Group hardware in labeled compartments matching corresponding cabinet numbers for streamlined reassembly
Store Screws and Parts
With all hardware now labeled and ready for removal, we’ll systematically extract every screw, hinge, knob, and pull from the cabinet system. We’ll use our screwdriver to carefully unscrew each piece, applying gentle pressure to guarantee avoiding stripping heads or damaging the wood.
As we work through the removal process, we’ll immediately transfer hardware into metal containers or old pots—establishing safe container storage that prevents loss or mixing. Our dedicated hardware workspace sits separate from the painting zone, keeping these components away from stripper chemicals and debris.
We’ll organize containers by location and hardware type: hinges together, pulls together, screws separate. This methodical approach guarantees we’ll find exactly what we need during reinstallation, streamlining our reassembly workflow.
Label and Organize Components
We’ll establish a systematic labeling protocol to track every component through the painting process. Using numbered labels or masking tape, we’ll mark each door with its corresponding cabinet opening, then separate hardware into location-specific containers—upper cabinets, lower cabinets, and specialty units.
We’ll photograph hinge orientations and screw placements before removal, creating a visual reference that eliminates guesswork during reinstallation.
Number All Doors Systematically
Proper door identification starts at the top left cabinet and proceeds sequentially through the entire set—typically numbering from 1 through 35 or more, depending on the kitchen size. We’ll use painter’s tape as our numbered template consistency foundation, placing it on hinge edges where paint won’t obscure our marks.
Our strategic marking technique follows these protocols:
- Apply tape to top surfaces for upper cabinets and bottom surfaces for lowers
- Add directional arrows pointing downward to indicate proper orientation during reinstallation
- Photograph each numbered door in position before removal, capturing hinge placements and cabinet box locations
- Create a visual map linking door numbers to their original positions
This systematic approach prevents installation errors and maintains organization throughout the finishing process, ensuring you’re working with professional-level precision.
Store Hardware by Location
Where should each hinge, screw, and mounting plate go once you’ve removed thirty-plus cabinet doors? We’ll organize hardware by its original location using a systematic approach that guarantees proper reassembly.
Start with clear plastic bins—one per cabinet door or section. Label each container with the corresponding door number from our previous step. This matching system eliminates guesswork during reinstallation.
For our workspace setup, we’ll utilize tiered shelf organizers to create visible storage levels. These prevent hardware mixing while maximizing vertical space. When working with corner cabinets or deeper storage areas, implement rotating storage solutions like lazy Susans for quick access without disturbing other containers.
Add removable dividers within bins to separate hinges from screws and mounting plates. This compartmentalization maintains hardware integrity throughout the painting process.
Track Hinge Placement Carefully
Each cabinet door requires a permanent identification system that survives the cleaning, priming, and painting phases without degradation. We’ll mark directly on door bottoms and hinge mortises—areas hidden after installation. This approach maintains consistent labeling patterns that tape-based systems can’t match, especially during TSP cleaning or deglosser application.
Our hinge tracking protocol:
- Number each hinge on its back surface with corresponding door numbers, designating top hinges as “a” and bottom as “b”
- Document hinge specifications including type, size, and orientation for each cabinet section
- Wrap labeled hinge sets together with tape to prevent mixing different door hardware
- Store complete hardware sets inside their corresponding cabinets to maintain location association
We’ll cover identification marks with blue tape during painting, then remove it to reveal clean, legible numbers.
Deep Clean All Cabinet Surfaces
Grease, cooking oils, and airborne particulates create an invisible barrier on cabinet surfaces that’ll sabotage paint adhesion before the first brushstroke. We’ll start by removing all contents and vacuuming interiors with a brush attachment to eliminate loose debris.
Apply a heavy-duty degreaser like TSP or diluted Dawn dish soap, letting it sit for several minutes before scrubbing with Scotch-Brite pads in circular motions. Focus on handles, frame edges, and the toe kick area where contamination concentrates.
Rinse thoroughly with clean water—multiple passes in heavily soiled zones—then follow with a 50/50 water-denatured alcohol solution that requires no additional rinsing. Inspect surfaces for proper cleanliness before drying completely with lint-free towels. Guarantee cabinet interiors are completely dry before proceeding to sanding and priming stages.
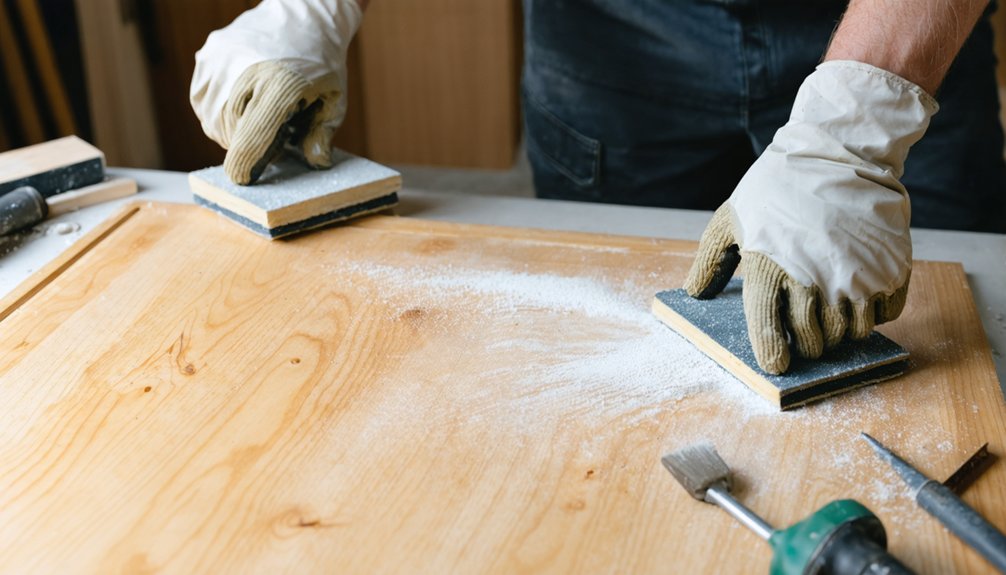
Sand to Remove Existing Finish
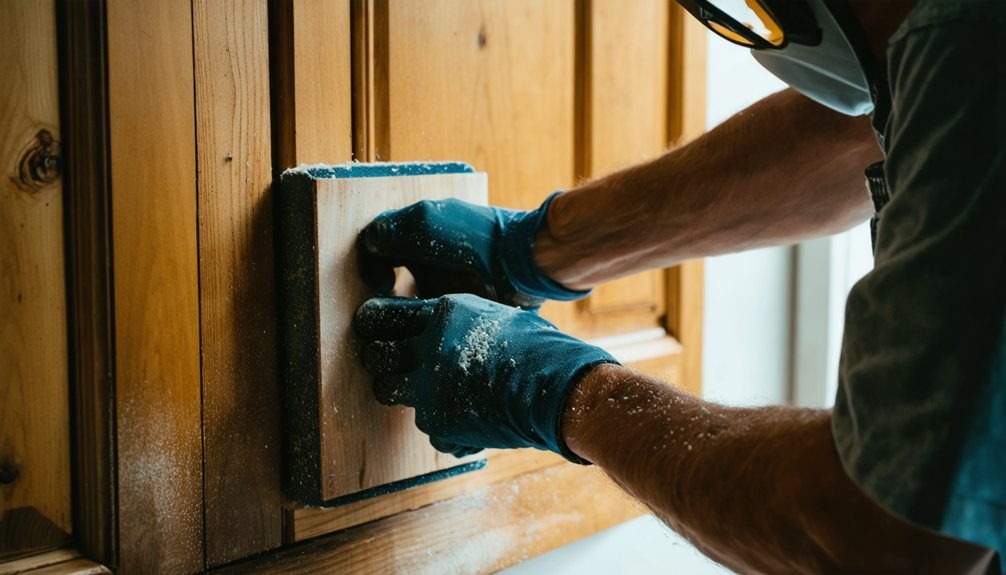
While mechanical abrasion creates the foundation for lasting paint adhesion, we’ll strategically remove gloss and create tooth without necessarily stripping to bare wood.
Our grit progression follows professional standards:
- Start with 120-150 grit to break through sealed surfaces and establish mechanical scratching patterns across all cabinet faces
- Progress to 180-220 grit for refining the scratch pattern while maintaining sufficient tooth for primer bonding
- Deploy palm sanders on flat surfaces, reserving sanding sponges and hand methods for detailed profiles and edges
- Apply paint stripper first on thick finishes, allowing 30-minute dwell times before scraping and final sanding
We’re removing shine, not necessarily finish. Clean all dust thoroughly post-sanding—residue compromises adhesion regardless of surface prep quality.
Fill Imperfections and Smooth Surfaces
Once we’ve primed (KILZ 3’s thicker formula fills minor grain irregularities simultaneously), we’re waiting 24 hours minimum before hitting it with 320-600 grit sandpaper. This knocks down brush marks and imperfections that’ll show through topcoats.
We’ll wipe everything with a damp cloth—dust particles sabotage adhesion and create texture we don’t want.
This sequence—fill, prime, sand, wipe—lets us minimize brush strokes and achieve professional finish. No shortcuts here.
Apply Bonding Primer
With surfaces properly filled and smoothed, we’re ready to lock everything down with bonding primer. This critical layer guarantees your topcoat adheres permanently and spreads evenly across every surface. Proper bonding primer application starts with choosing the right formula—water-based for previously painted cabinets, oil-based for maximum forgiveness, or hybrid for balanced performance.
Bonding primer creates the essential foundation that locks your topcoat in place and ensures flawless, long-lasting cabinet results.
Follow these application standards:
- Test adhesion in an inconspicuous area before full coverage
- Apply with mini foam rollers on flat surfaces and angled brushes for detailed areas
- Observe correct primer thinning requirements—approximately 15% for sprayers, straight-from-can for rollers
- Allow 24 hours minimum drying time before light sanding with very fine grit sandpaper
Remove all dust with tack cloths before moving forward.
Allow Proper Drying Time
Proper drying time separates professional-grade cabinet finishes from failed amateur attempts. We must consider recommended intervals between coats—typically 24 hours minimum—to prevent adhesion failure and finish degradation. Touch-dry doesn’t mean cure-ready; primer requires complete molecular bonding before topcoat application.
We comply with manufacturer guidelines religiously. Benjamin Moore Advance and similar premium formulations specify exact intervals for ideal performance. Environmental factors matter: we maintain 70-80°F with 40-60% humidity and guarantee adequate ventilation using fans to accelerate moisture evaporation.
We never rush this phase. Skipping proper drying compromises substrate adhesion and extends total project time through remedial work. After final coat application, we wait 24-48 hours before reassembly, then allow 2-4 weeks for complete curing depending on paint type. Patience here delivers the durable, professional finish we’re building together.
Final Sanding and Surface Inspection
After primer has fully cured, we’re ready to perfect the surface that’ll determine our final paint quality. We’ll use 220-grit sandpaper, working exclusively with the wood grain to eliminate any imperfections. For efficiency, we tackle small sections systematically before addressing trim details.
Our proven finishing process:
- Sand with 220-grit paper using consistent pressure, letting the abrasive do the work
- Vacuum thoroughly between passes to prevent dust contamination
- Apply light moisture application to raise the grain before final sanding
- Conduct thorough inspection by feeling every surface for rough spots
We use sanding sponges for tight corners and random orbital sanders for flat panels. After each stage, we remove all dust with tack cloths. This exhaustive approach transforms decent prep into professional-grade results.
Frequently Asked Questions
Can I Paint Cabinets Without Removing Them From the Wall?
We can paint cabinets in place successfully. Spray painting cabinets requires proper masking techniques and ventilation. We’ll protect painting hinges and hardware with painter’s tape, or remove them entirely. Multiple thin coats guarantee professional results without removal.
How Much Does It Cost to Prep and Paint Kitchen Cabinets?
We’re looking at $900–$6,764 total paint cost depending on kitchen size. Factor in $50–$100/hour labor estimate plus materials. Small kitchens run cheaper; larger layouts demand premium investment for professional-grade results.
Should I Use Oil-Based or Water-Based Paint for Kitchen Cabinets?
We recommend water-based paint for most kitchen cabinets—specifically latex-based paint options or acrylic paint applications. They’re VOC-compliant, won’t yellow, and deliver professional results when sprayed correctly, making them our go-to choice for modern cabinet refinishing.
How Long Before I Can Use My Kitchen After Painting?
We’ll guide you through proper cure time for scheduling kitchen usage. Light activity starts after 2-3 days, but we recommend waiting 21-30 days for water-based paints to fully cure before resuming normal operations and deep cleaning.
Do I Need to Prime Cabinets if They’re Already Painted?
We’ll always prime previously painted cabinets—regardless of wood type or paint condition. Primer guarantees proper adhesion between your existing finish and new topcoat, preventing premature chipping and peeling that’d compromise your hard work within months.