We’ve found that painted cabinets last substantially longer when you establish a weekly cleaning routine with microfiber cloths, perform monthly thorough cleaning sessions targeting high-use zones, and select cleaning products matched to your specific paint finish—mild dish soap for matte surfaces, specialty cleaners for satin, and diluted vinegar for high-gloss. You’ll also need to maintain stable humidity levels between 30-50% and address any chips or scratches immediately. The detailed strategies below will help you protect your cabinet investment for years.
Key Takeaways
- Wipe cabinets weekly with soft microfiber cloths and address spills immediately to prevent paint damage and maintain finish integrity.
- Deep clean monthly using mild dish soap or baking soda paste, targeting high-use areas and avoiding harsh abrasives or ammonia-based products.
- Select cleaning products based on paint finish: mild soap for matte, specialty cleaners for satin, and diluted vinegar for glossy surfaces.
- Maintain indoor temperature between 70-75°F and humidity at 30-50% using exhaust fans and dehumidifiers to prevent paint deterioration.
- Clean systematically from top to bottom, prioritizing high-contact zones like handles and corners with soft-bristled brushes for detailed areas.
Establish a Weekly Cleaning Schedule for Your Painted Cabinets
A structured weekly maintenance protocol forms the foundation of long-term paint preservation on cabinet surfaces. We’ll establish daily wiping routines using soft microfiber cloths to remove dust and address spills immediately, safeguarding paint integrity through minimal pressure application. This prevents chemical damage while preserving surface quality.
When we incorporate light exterior cleaning into our weekly schedule, we’re prioritizing areas around stoves, sinks, and food prep zones where grime accumulates most rapidly. Our technique involves misting microfiber cloths with mild dish soap solution, then applying circular motions in top-to-bottom patterns for thorough coverage.
We’ll focus on hardware details using soft-bristled brushes for corners and grooves, followed by thorough drying to prevent rust buildup. This all-encompassing approach guarantees we’re protecting our investment while maintaining professional-grade cabinet appearance.
Deep Clean Your Cabinets Monthly to Prevent Buildup
We’ll implement a systematic monthly deep cleaning protocol that addresses both visible surfaces and concealed areas where grime accumulates. This process requires us to target high-contact zones first, then methodically clean interior shelving and components using pH-appropriate cleaning solutions.
Target Problem Areas First
Strategic cleaning requires identifying high-accumulation zones before beginning the monthly deep clean. We’ll concentrate our efforts where grease and grime naturally concentrate, ensuring our painted cabinets receive attention where it matters most.
Priority zones for focused application techniques:
- Handles and knobs where buildup collects at hardware edges
- Corners, grooves, and decorative profiles that trap residue
- Areas surrounding stoves, sinks, and prep zones experiencing heavy usage
- Interior cabinet spaces including hidden door panel edges and hinges
Our routine inspection schedules should emphasize these problem areas during weekly maintenance. We’ll apply baking soda paste to stubborn spots, allowing five minutes of contact time. A soft-bristled toothbrush reaches detailed areas where cloths can’t penetrate. Starting from top surfaces and working downward prevents drips, maintaining our quality standards throughout the process.
Clean Interior Shelves Too
Monthly deep cleaning extends beyond visible cabinet faces to encompass interior shelving systems that accumulate particulate matter and residue from stored goods. We’ll remove items from high-traffic drawers and shelves to enable thorough wipe-downs with soft, damp cloths and wood-safe cleaners. This process prevents dust, grease, and food debris buildup that compromises cabinet longevity.
As we organize interior shelves, we’ll inspect shelf weight distribution to identify potential structural concerns. Overloading causes sagging shelves and warped doors, reducing cabinet lifespan. We’ll evaluate placement of heavy appliances, stacked dishes, and large pantry staples, redistributing weight evenly across shelving units.
This systematic approach prevents minor issues from escalating into costly repairs while maintaining ideal functionality. Our consistent monthly routine protects the investment we’ve made in quality cabinetry.
Use Appropriate Cleaning Solutions
Deep cleaning painted cabinets requires selecting solutions that balance effective grease removal with paint preservation. We recommend testing any cleaner on an inconspicuous area first to protect your prime cabinet paint finish.
Proven cleaning solutions include:
- Dawn dish soap mixed with warm water—cuts through grease without stripping paint
- 50/50 distilled vinegar and water solution for heavier buildup
- Bona Cabinet Cleaner or Method All-Purpose Cleaner for specialized care
- Baking soda paste for stubborn spots requiring mild abrasiveness
We must avoid harsh cleaners containing abrasives that damage paint integrity. Apply solutions using bucket systems rather than sprayers to prevent runs and streaks. Microfiber cloths work best for application, using circular motions followed by thorough drying. Focus extra attention on stovetop-adjacent cabinets where grease accumulates most heavily.
Choose the Right Cleaning Products Based on Your Paint Finish
The paint finish on your cabinets directly determines which cleaning products you’ll use and how you’ll apply them. We recommend mild dish soap and warm water for matte or chalk finishes, which absorb grease easily and demand gentle handling to preserve finish appearance.
For satin and eggshell surfaces, specialty cabinet cleaners like Bona or Weiman work best, maintaining finish durability without compromising the coating. Semi-gloss and high-gloss finishes tolerate stronger solutions—we’ve found diluted white vinegar (equal parts vinegar and water) effectively cuts through grease while safeguarding the sheen.
Always avoid bleach, ammonia-based cleaners, and abrasive scrubbers across all finish types. These harsh products strip protective layers and weaken finish durability. Test any new cleaner on a hidden area first to verify compatibility with your specific paint formulation.
Control Temperature and Humidity to Protect Cabinet Paint
We maintain cabinet paint integrity by controlling environmental conditions within specific parameters: 40-50% relative humidity and temperatures between 40-90°F. Seasonal fluctuations cause wood expansion and contraction cycles that compromise paint adhesion, with winter dryness creating brittle, cracked finishes and summer moisture triggering swelling and peeling.
We’ll address strategies for stabilizing conditions year-round, with particular attention to moisture-prone areas like kitchens and bathrooms where humidity spikes accelerate paint failure.
Ideal Temperature and Humidity
Maintaining cabinet paint quality demands precise environmental control, specifically temperature stability between 70-75°F and humidity levels within the 30-50% range. We’ll safeguard our investment by understanding how seasonal temperature shifts and humidity fluctuations directly impact cabinet longevity.
Critical environmental parameters include:
- Temperature consistency prevents wood movement that causes joint separation and finish cracking
- 30-50% humidity range preserves moisture balance in kiln-dried cabinetry components
- Dew point monitoring guarantees 10°F buffer below surface temperature to prevent condensation interference
- Humidity extremes between 20-70% trigger expansion or contraction leading to visible joint lines and adhesion failure
We’re establishing a foundation for cabinet preservation through systematic environmental monitoring. Digital hygrometers, whole-house humidification systems, and strategic ventilation create the stable conditions our painted cabinets require for optimal performance.
Managing Moisture-Prone Areas
Moisture-prone environments demand systematic intervention strategies that extend beyond baseline temperature and humidity controls. We’ll implement exhaust fans in kitchens and bathrooms to eliminate humid air before it contacts cabinet surfaces.
Condensation prevention requires sealing cabinet edges and joints with quality caulk, preventing water infiltration into wood grain and painted finishes. We’re incorporating ventilation maintenance protocols that include opening windows when conditions permit and running fans during moisture-generating activities.
Dehumidifiers prove essential in high-humidity climates, pulling water from the air and maintaining ideal conditions for paint adhesion. We’ll address spills immediately—whether water, oils, or cleaning products—using clean cloths to prevent moisture penetration.
Regular inspection of water lines and appliances prevents catastrophic leaks. These interventions create protective barriers that preserve our painted cabinets’ structural integrity and aesthetic quality.
Maintain Cabinet Hardware to Reduce Wear and Tear
Cabinet hardware experiences constant stress from daily operation, making scheduled inspection and maintenance essential for long-term performance. We recommend you inspect fasteners regularly—every six months—to catch loose screws before they cause misalignment or wobbling.
When you lubricate moving parts periodically, you’ll prevent friction-related wear and extend component lifespan.
Our systematic hardware maintenance approach includes:
- Fastener tightening – Address hinges, handles, and drawer slides before minor looseness becomes structural damage
- Strategic lubrication – Apply appropriate lubricants to metal slides and hinges to eliminate squeaking and sticking
- Material-specific cleaning – Use brass cleaner for brass, stainless steel solutions for steel, or mild soap universally
- Moisture management – Thoroughly dry hardware after cleaning to prevent oxidation and corrosion
This proactive routine prevents costly replacements while ensuring your cabinet system operates flawlessly.
Handle Spills and Stains Immediately to Prevent Damage
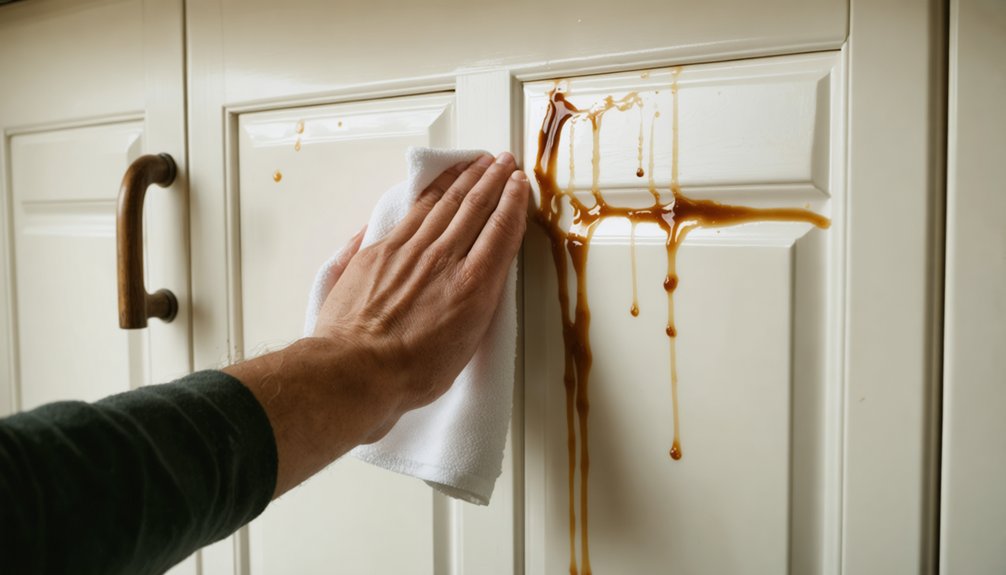
When spills contact painted cabinet surfaces, immediate response determines whether you’ll face simple cleanup or permanent damage. We recommend keeping microfiber cloths accessible in your kitchen for rapid response.
Blot spills immediately with a barely damp cloth, then follow with a dry towel to minimize drying time and prevent water marks from forming.
Focus particular attention on hinges and handles where moisture accumulates quickly. These areas demand immediate drying since excess water degrades both paint and underlying wood. We’ve found that avoid excess moisture by wringing cloths until they’re barely damp before contact with surfaces.
For stubborn stains, apply appropriate solutions—mild dish soap for food stains, vinegar-water mixture for grease—but always dry thoroughly afterward. This disciplined approach preserves your cabinet finish and prevents permanent staining.
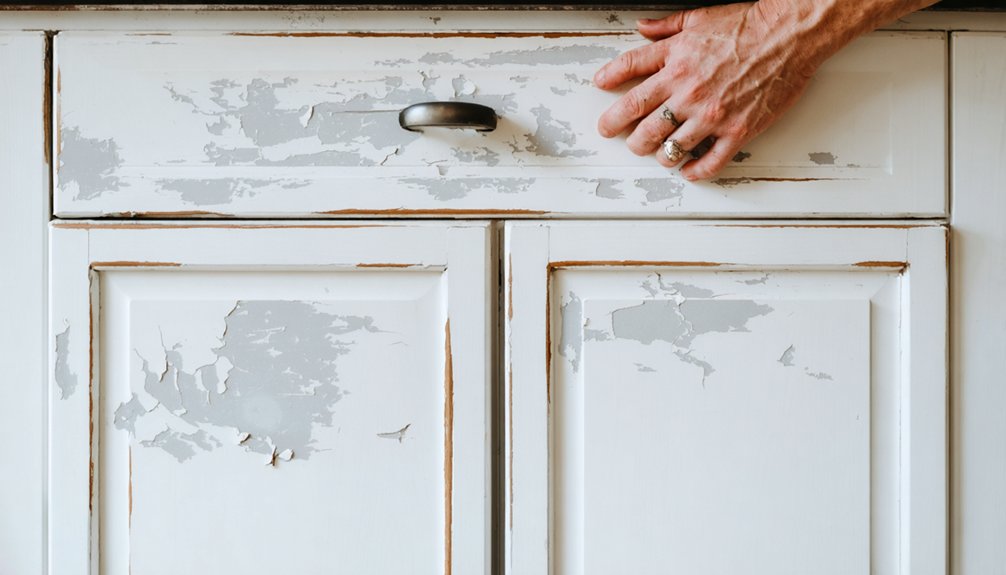
Touch Up Paint Chips and Scratches as Soon as They Appear
Although paint chips and scratches may appear insignificant initially, they compromise your cabinet’s protective barrier and accelerate deterioration if left unaddressed. We’ll guide you through professional-grade repair techniques that restore your cabinets’ integrity.
Don’t ignore minor cabinet damage—small chips and scratches break down protective finishes and lead to costly repairs down the road.
Begin with thorough paint quality inspection, running your fingers across surfaces to detect subtle divots and imperfections. Once identified, we’ll employ proper touch up application techniques:
- Clean damaged areas with warm soapy water, ensuring complete drying before proceeding
- Lightly sand affected zones with medium grit sandpaper to create ideal adhesion texture
- Apply bonding primer in thin coats for enhanced durability on exposed surfaces
- Build color gradually using multiple light coats rather than single heavy applications
Test your touch-up paint in inconspicuous locations first, verifying color and sheen match perfectly before addressing visible damage.
Know When to Call in Professional Refinishing Services
Understanding refinishing thresholds separates cost-effective maintenance from unnecessary expenses. We recognize extensive peeling across multiple surfaces, persistent streaks that touch-ups can’t correct, and compromised adhesion from grease buildup as clear indicators for professional intervention. These conditions demand specialized equipment and commercial-grade materials that exceed typical homeowner capabilities.
DIY versus professional considerations center on surface preparation complexity and final finish quality. We achieve factory-smooth, rock-hard finishes through professional sprayers and multi-coat applications—results impossible with consumer-grade tools. The impact on resale value justifies professional refinishing when cabinets show structural misalignment or degraded topcoats.
Professional services complete restoration in days, not weeks, using primers and protective coatings that prevent future deterioration. This investment costs substantially less than replacement while delivering comparable aesthetic improvements.
Frequently Asked Questions
Can I Use Commercial Kitchen Cleaners on Painted Cabinets?
We don’t recommend commercial kitchen cleaners for painted cabinets—they’ll damage your finish. Instead, we’ll help you avoid harsh chemicals by using gentle, cabinet-specific products while we monitor for wear and tear to preserve your investment’s quality and longevity.
How Long Should I Wait After Painting Before Cleaning My Cabinets?
Like fine wine aging to perfection, we’ll wait 3–4 weeks before cleaning newly painted cabinets. This waiting period after application guarantees proper curing, while drying time considerations protect our investment’s professional finish and long-term durability.
Are Steam Cleaners Safe to Use on Painted Cabinet Surfaces?
We don’t recommend steam cleaners on painted cabinets, as high temperatures damage finishes. If you’re determined to try, use low moisture application with careful technique, testing inconspicuous areas first. However, gentler methods preserve your cabinet’s quality better long-term.
Should I Apply a Protective Sealant Over Painted Cabinets?
We’ve seen cabinets in busy family kitchens maintain pristine finishes for over a decade with proper sealant protection. We strongly recommend applying protective topcoats with periodic reapplication every few years and routine inspections to guarantee optimal barrier integrity throughout your cabinet’s lifespan.
What’s the Best Way to Remove Grease Buildup Without Damaging Paint?
We’ll gently wipe grease buildup using a damp microfiber cloth with mild soap solution, working in circular motions. This proven method protects your paint’s integrity while effectively removing residue. For stubborn spots, we’ll let the solution sit briefly before wiping.