We’ll start by selecting a gas-powered washer delivering 2,500–3,000 PSI for standard concrete or 3,000–4,000 PSI for heavy-duty stains. After donning safety goggles, chemical-resistant coveralls, and steel-toe boots, we’ll clear the driveway and apply concrete-safe pre-treatment solutions with 5-10 minutes dwell time. We’ll maintain our wand 6-12 inches from the surface using 25-degree nozzles, working in 10×10-foot sections with overlapping passes to prevent zebra striping. The techniques below guarantee professional results while protecting your investment.
Key Takeaways
- Use a gas-powered washer with 2,500–3,500 PSI and 2.5 GPM, paired with a 25-degree nozzle for optimal concrete cleaning.
- Clear the driveway of all objects, sweep debris, pre-wet the surface, and apply concrete-safe degreasers to stubborn stains.
- Test pressure settings on an inconspicuous spot, holding the wand 12 inches away to avoid surface damage like etching.
- Work in 10×10 foot sections using overlapping sweeping motions, maintaining 6–12 inch wand distance for streak-free results.
- Rinse thoroughly with a 40-degree nozzle using downward strokes, then wait 24–48 hours before applying sealer if desired.
Selecting the Right Pressure Washing Equipment
Proper equipment selection determines both cleaning effectiveness and surface protection when pressure washing driveways. We’ll need 2,500–3,000 PSI for standard concrete work, while heavy-duty stains require 3,000–4,000 PSI with pretreatment. Matching PSI and GPM guarantees excellent performance—pairing 4 GPM units with 16-inch surface cleaners delivers efficient results on cement driveways.
Gas-powered washers provide the necessary 2,500–4,000 PSI range for tough jobs, whereas electric models suit lighter applications with smaller 12–14 inch cleaners. For nozzle selection, we recommend 25025 nozzles in surface cleaners on concrete surfaces. When choosing surface cleaner sizes, 20–30 inch models work best for driveways, with 24-inch or larger options drastically reducing cleaning time on expansive areas. Remember, each nozzle maintains 2,500 PSI—they don’t combine output.
Gathering Essential Safety Gear and Protective Equipment
Before operating pressure washing equipment, we must assemble detailed personal protective equipment (PPE) to safeguard against high-pressure water streams exceeding 3,000 PSI, chemical exposure, and impact hazards. Safety goggles and full-face shields prevent eye injuries from debris propelled at extreme velocities.
We’ll need reinforced waterproof gloves meeting OSHA 29 CFR 1910.138 standards to resist chemical burns and high-pressure water injections. Steel-toe boots complying with 29 CFR 1910.136 guarantee secure footing on wet surfaces. Chemical-resistant coveralls shield our bodies from caustic solutions and water jets.
Hearing protection becomes essential for gas-powered units, while respirators guard against hazardous fumes. Training requirements mandate proper cleaning procedures and PPE inspection protocols. Remember, water streams at merely 100 PSI can cause severe lacerations—comprehensive protection isn’t optional.
Clearing and Preparing Your Driveway Surface
With our personal protective equipment secured, we now focus on establishing a contamination-free work zone. We’ll remove all vehicles, bikes, furniture, and movable objects from the driveway perimeter. Examining surface condition during this phase allows us to identify erosion patterns and structural cracks requiring attention.
We’ll sweep away loose debris—gravel, leaves, twigs, and pebbles—that could become dangerous projectiles under high-pressure impact.
Next, we’ll pre-wet the entire surface using a garden hose, loosening surface dirt and preparing surrounding vegetation. For stubborn oil stains and mildew, we’ll apply concrete-safe degreasers or sodium hypochlorite solutions with appropriate dwell time. Avoiding chemical residue proves critical when sealing preparations follow—we’ll opt for 200-degree hot water treatments instead, which effectively kill organic matter and degrease surfaces without compromising future sealant adhesion.
Testing Pressure Settings Before Full Application
Before we commit to cleaning the entire driveway, we’ll test our pressure settings on a small, hidden section to verify we won’t cause etching or surface damage.
We should begin in a less visible corner, holding the wand 12 inches from the surface while using our 25-degree nozzle in a sweeping motion. If the initial pass doesn’t remove dirt effectively, we’ll gradually increase the PSI rather than starting at maximum pressure and risking permanent damage to the concrete.
Choose an Inconspicuous Spot
Testing pressure settings on a hidden section of the driveway prevents irreversible damage to the concrete surface. We’ll select test sample locations in less visible corners or areas obscured from primary viewing angles—spots that represent the same material composition as our main cleaning zone. This test surface evaluation protects us from costly mistakes while we dial in ideal settings.
We should hold the wand approximately 12 inches from the surface and start with lower pressure before advancing upward. This methodical approach helps us observe how the concrete responds to sustained application without creating permanent etch marks or chips. By testing in inconspicuous areas first, we’re developing familiarity with our equipment’s force while ensuring the surface can handle our chosen PSI settings.
Adjust Pressure Gradually Upward
The pressure washer’s lowest PSI setting establishes our baseline for testing, protecting the concrete from immediate damage while we observe surface response. We’ll increase pressure in 200-300 PSI increments, monitoring pressure consistency between adjustments to identify the minimum effective setting.
Each increment requires 15-20 seconds of application time, controlling surface agitation while evaluating contaminant removal. For standard concrete driveways, we’re targeting 2,500-3,000 PSI, but weathered surfaces may require stopping at lower thresholds.
Between adjustments, we’ll inspect for etching, pitting, or streaking—signs we’ve exceeded safe parameters. Our fan tip distributes force evenly during this calibration phase, preventing concentrated damage. This methodical approach prevents permanent marks while establishing ideal settings that balance cleaning effectiveness with surface preservation across varying concrete densities.
Applying Pre-Treatment Solutions to Concrete
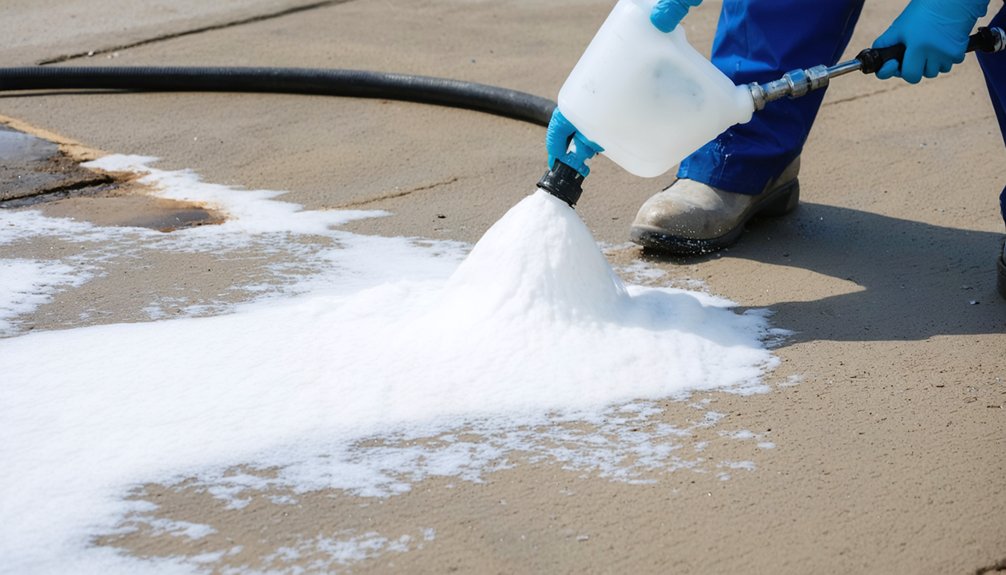
We’ll apply pre-treatment solutions to break down embedded contaminants that pressure washing alone can’t remove from concrete’s porous surface. The process requires selecting an appropriate degreaser or chemical cleaner, diluting it to manufacturer specifications, and allowing sufficient dwell time for the solution to penetrate and react with stains.
Our approach focuses on three critical elements: matching the chemical to the contamination type, achieving proper concentration ratios, and timing the application to maximize cleaning effectiveness while preventing surface damage.
Choosing the Right Degreaser
Selecting an appropriate degreaser requires matching the product’s chemical formulation to your driveway’s specific stain type and surface condition. When comparing degreaser performance, we’ve found Purple Power and Super Clean outperform standard options like Zep on heavy oil deposits, while Spray Nine delivers rapid action on tough stains.
For evaluating safety and eco-friendly features, biodegradable formulas like Krud Kutter and Simple Green Oxy Solve protect surrounding vegetation without compromising effectiveness. We must verify compatibility with painted or sealed surfaces—products containing sodium hydroxide can etch unprotected concrete and damage aluminum trim.
Detergent-based surfactants handle general dirt, citric acid targets rust and efflorescence, while sodium hydroxide excels at breaking down accumulated grease. Enzyme-based cleaners offer gentler alternatives for routine maintenance applications.
Proper Dilution and Application
Before applying any pre-treatment solution, we’ll need to prepare the concrete surface by thoroughly wetting it with a garden hose—this critical step opens the pores and prevents rapid solution absorption that’d reduce dwell time effectiveness.
We’ll apply our chosen pre-treatment using a downstream injector, 12-volt pump, X-jet, or pump-up sprayer, depending on our setup.
For house wash concentrations at 1.87% sodium hypochlorite, we’ll start with a light mist to initiate organism breakdown, followed by heavier application.
When working with sodium hydroxide solutions, proper storage requirements demand sealed containers away from incompatible materials.
Throughout application, dwell time monitoring guarantees an ideal chemical reaction—typically 10-15 minutes before pressure washing.
We’ll always wear protective goggles and gloves, especially when handling alkaline cleaners that pose irritation risks.
Dwell Time Best Practices
Achieving ideal results from our pre-treatment solution hinges on maintaining proper dwell time—the critical window between application and pressure washing when chemicals actively permeate concrete’s porous structure. We’ll optimize solution penetration while avoiding surface discoloration by following these guidelines:
- Light contamination: 5-7 minutes allows adequate breakdown of surface dirt and mild organic growth
- Heavy mold or algae: 10 minutes guarantees deep penetration into pores where organisms thrive
- Hot weather conditions: Reduce dwell by 2-3 minutes to prevent premature drying and streaking
We must monitor our solution throughout the dwell period, keeping surfaces wet through misting if necessary. Excessive dwell risks etching and uneven cleaning patterns, while insufficient time leaves contaminants embedded. Proper timing delivers consistently superior results across the entire driveway surface.
Using Proper Pressure Washing Techniques
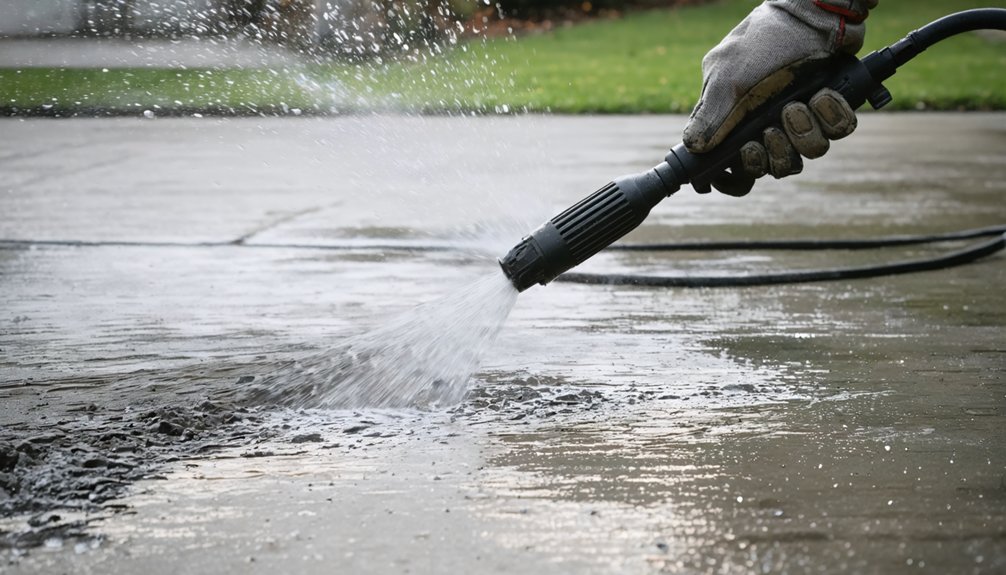
Proper pressure washing technique begins with equipment calibration and nozzle selection matched to your driveway’s surface composition. We’ll achieve ideal results using 25-degree green nozzles for expansive flat areas, while 15-degree yellow nozzles handle all-purpose applications effectively. Surface preparation requires testing spray patterns on inconspicuous corners before full deployment.
Maintain wand distance at 6 to 12 inches consistently, employing sweeping motions with overlapping passes to eliminate streaking. We’ll start at low-pressure settings, gradually increasing based on stain severity—typically 2,500 to 3,500 PSI for concrete surfaces paired with 2.5 GPM flow rates.
Safety protocols demand protective eyewear, closed-toe footwear, and gloves throughout operation. Surface cleaner attachments accelerate coverage while preventing zebra striping patterns that compromise professional results.
Working in Sections for Optimal Results
We’ll divide the driveway into manageable quadrants to guarantee systematic coverage and prevent uneven cleaning results. Working section by section stops soap from drying on the concrete, which causes streaking and potential surface damage on hot days.
We’ll maintain a consistent overlap pattern between sections—typically 2-3 inches—to eliminate visible lines and secure uniform cleaning across the entire surface.
Divide Driveway Into Quadrants
When tackling a large driveway, we’ll achieve superior results by dividing the surface into four equal quadrants rather than attempting to clean the entire area in one pass. This method improves efficiency by 20-30% while managing fatigue during extended sessions.
We can establish quadrants using several practical techniques:
- Measure and mark the driveway’s length and width for precise quarter splits using chalk or high-visibility tape
- Identify natural divisions like expansion joints or existing cracks as convenient boundaries
- Place corner cones to maintain clear visual references throughout the cleaning process
Our coordinating sequence should begin at the highest point, completing one quadrant fully before advancing. We’ll limit each section to 10×10 feet for ideal control, adjusting based on our pressure washer’s power and any surface cleaner attachments we’re using.
Prevent Soap From Drying
Why does chemical application fail on driveways despite proper dilution ratios? We’ve found the answer lies in dwell time management. When we apply sodium hypochlorite at 1.5% concentration, we maintain a strict 10-minute maximum window before rinsing. Working in quadrants prevents the chemical from drying on surfaces, which creates residue and reduces effectiveness.
We recommend using hotter chemical mixes through X-Jet systems—this reduces required dwell time extensively. For precision work, we rely on 12V bleach-rated sprayers that deliver controlled amounts to limited sections. The key is maintaining wetness throughout the process. Our 4000 PSI machines allow multiple slow passes with surface cleaners, keeping areas moist until rinse. We avoid drying by working in shaded conditions and rinsing immediately after treatment, ensuring consistent results across the entire driveway.
Maintain Consistent Overlap Pattern
Professional pressure washing depends on systematic overlap patterns that eliminate streaking and ascertain uniform cleaning across concrete surfaces. We’ve found that maintaining consistent overlap between passes prevents the random variations that create visible lines on your driveway.
Essential overlap techniques we use:
- 10-20% overlap during surface cleaner passes verifies even pressure distribution without excessive coverage
- Cross-hitting method cleans each section twice—vertical passes first, then horizontal—to eliminate directional streaking
- Circle technique employs slow, overlapping circular motions (50% overlap) moving left-to-right, then reversing direction
Avoiding variable patterns is critical. We divide large driveways into manageable sections, working systematically through each area before advancing. This sectioning approach allows us to pretreat, clean, and rinse methodically, confirming every square foot receives identical treatment for professional-grade results.
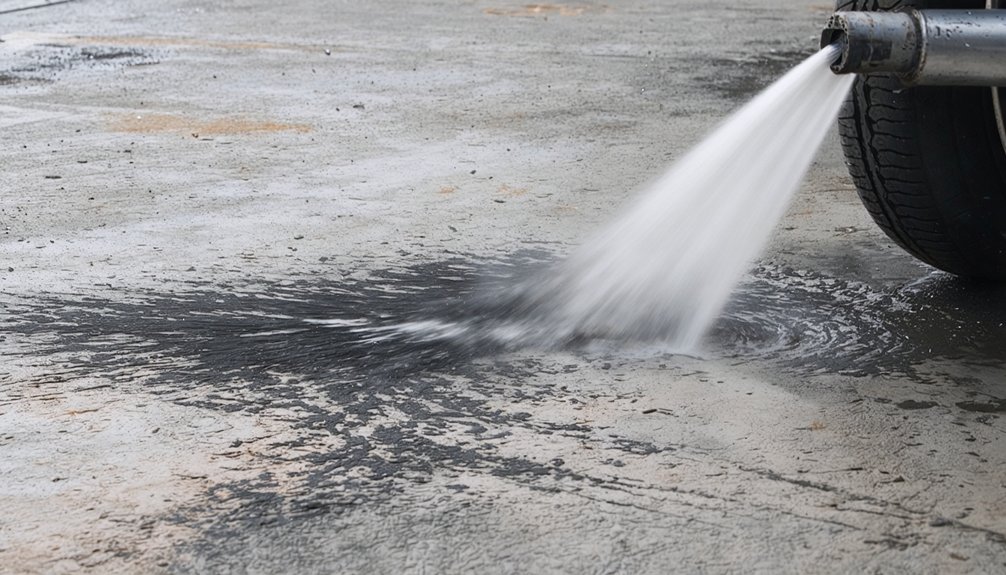
Rinsing Away Detergent and Residue
After detergent application, proper rinsing determines whether your driveway achieves a clean finish or develops unsightly chemical streaks. We’ll switch to a 40-degree nozzle or soap fan option after clearing all detergent from our system. Starting at the highest point, we’ll work downward using the same intersecting stroke pattern we applied during soaping.
Preventing chemical residue requires continuous wand movement and sectional work—we can’t let detergent dry between applications. We’ll rinse crevices and edges where soap accumulates, ensuring rinsing thoroughly covers every square inch.
For surface cleaner users, we’ll employ a push-pull method, then rinse opposite our initial direction to eliminate stripe lines.
On particularly stubborn areas, we won’t hesitate to repeat the entire soap-and-rinse sequence until we’ve achieved professional results.
Addressing Stubborn Stains and Problem Areas
Despite our systematic cleaning approach, certain stains won’t surrender to standard pressure washing protocols—these problem areas demand targeted pre-treatment and specialized techniques.
Some stains refuse to yield to conventional methods—they require dedicated pre-treatment strategies and advanced pressure washing techniques for complete removal.
For oil and grease stains, we’ll apply degreasing detergents and allow several minutes of penetration before extraction. Dark stubborn spots require a 70% sodium hypochlorite solution in our pump-up sprayer. We’ll address these challenges through specialized pressure setting adjustments, typically ranging from 2000-3000 PSI for tough concrete stains.
Our strategy includes:
- Tailored nozzle selection: rotating turbo nozzles for grease extraction, wide-angle spray patterns for mold prevention
- Temperature optimization: hot water above 100°F for dissolving embedded oil
- Repetitive applications: multiple passes on persistent dark spots post-surface cleaning
We’ll inspect each treated area, re-treating remnants until we’ve achieved complete stain elimination through our systematic approach.
Sealing Your Driveway After Cleaning
The integrity of your freshly cleaned driveway hinges on proper sealing—a critical step that transforms surface porosity from a vulnerability into a fortified barrier. Applying compatible sealers requires bone-dry conditions—we’ll wait 24-48 hours post-cleaning to guarantee complete moisture evaporation. This drying time consideration prevents bonding failures like white blushing or flaking that compromise our protective investment.
We’ll select penetrating sealers like silane siloxane for concrete or asphalt-based formulations for blacktop surfaces. Using a roller, we’ll apply two thin layers, allowing the first to cure before the second application. This methodology creates a waterproof membrane reducing water intrusion by 95% while strengthening concrete up to 45%. Before walking or driving on the sealed surface, we’ll observe the 24-48 hour cure window with clear weather forecasted throughout.
Frequently Asked Questions
How Often Should I Pressure Wash My Driveway?
We recommend pressure washing your driveway twice yearly as part of seasonal maintenance. Through periodic inspections, we’ll identify environmental factors like mold growth or heavy traffic that may require quarterly cleaning to protect your surface integrity.
Can Pressure Washing Damage or Crack My Concrete Driveway?
Yes, we can damage your driveway through improper technique damage—excessive PSI, wrong nozzles, or stationary spraying cause concrete surface degradation like etching and pitting. However, we’ll protect your investment by using proper pressure settings and controlled application methods.
What’s the Average Cost to Hire a Professional Driveway Pressure Washer?
We’ll typically pay $0.25 to $0.40 cost per square foot for professional driveway pressure washing, though the average hourly rate runs $60 to $125. Most standard driveways cost between $150 and $300 for proper cleaning.
How Long Does It Take for a Driveway to Dry Completely?
Picture water beads evaporating under bright sunshine—we’ll tell you driveway surface material dictates drying times. After proper driveway cleaning techniques, concrete needs 24-48 hours, while block paving requires 36-72 hours for complete moisture evaporation and safe sealing.
Will Pressure Washing Remove Old Oil Stains From My Driveway?
We’ll substantially reduce old oil stains by spot treating stains with hot water pressure washing and using degreasing agents, though complete removal isn’t guaranteed. Pre-treating for 15-30 minutes and proper agitation techniques deliver our best results together.