We’ve found that successful interior painting in Declo starts with thorough wall preparation using mild soap and water, followed by filling imperfections with fast-drying joint compound. You’ll need quality synthetic-bristle brushes, 9-inch microfiber roller covers with appropriate nap length, and proper painter’s tape for crisp lines. Maintain substrate temperatures between 50-85°F during application, apply primer plus two finish coats using systematic “N” patterns, and allow 2-4 hours between coats for ideal adhesion. Our extensive guide below covers advanced techniques that’ll transform your results from amateur to professional-grade.
Key Takeaways
- Clean walls with lukewarm water and mild soap; use grease-cutting detergent in kitchens and water-bleach solution for mildew.
- Apply painter’s tape strategically, caulk gaps before taping, and remove tape while caulk is still wet for crisp lines.
- Paint ceiling first, then trim and doors, followed by walls from top to bottom in sections.
- Invest in quality synthetic brushes and 9-inch microfiber roller covers with appropriate nap length for your surface texture.
- Apply primer plus two finish coats, allowing 2-4 hours between coats while maintaining room temperature between 50-85°F.
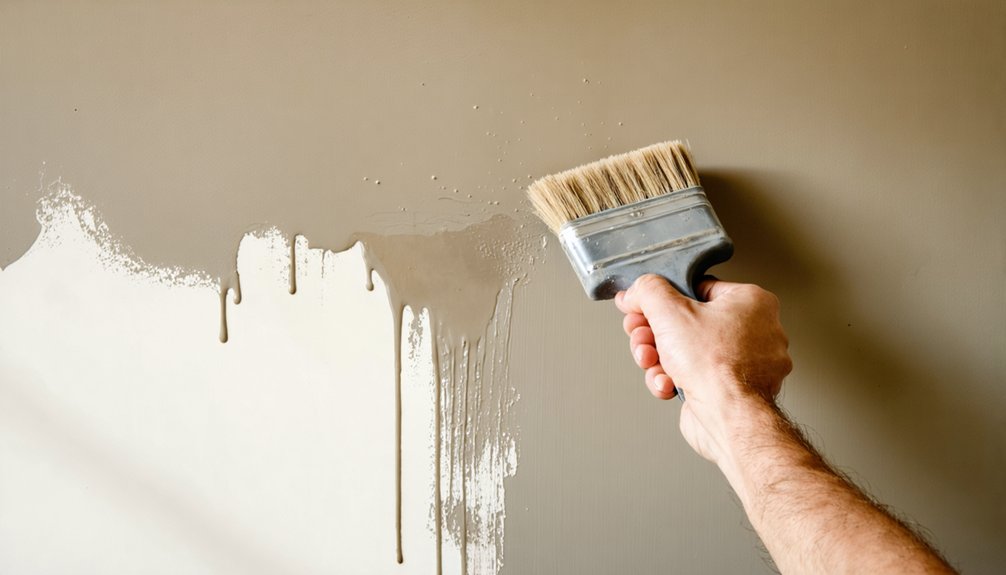
Preparing Your Walls and Trim for a Professional Finish
Before applying the first coat of paint, proper wall preparation determines whether you’ll achieve a professional finish or reveal every surface imperfection. We’ll guide you through essential wall cleaning procedures that start with lukewarm water and mild soap applied in circular motions.
Professional paint results start with meticulous wall preparation—skipping this crucial step guarantees every flaw will show through your finished surface.
Kitchen surfaces require grease-cutting detergent, while mildew demands a three-to-one water-bleach solution.
Our surface repair solutions involve filling drywall holes with fast-drying joint compound mixed to peanut butter consistency. We feather each application 8-12 inches beyond the patch using a broad drywall knife, sanding between multiple coats until smooth.
Next, we sand glossy surfaces with 100-150 grit sandpaper to guarantee proper primer adhesion. After vacuuming baseboards and wiping walls with tack cloth, we’re ready to spot-prime repaired areas for maximum paint performance.
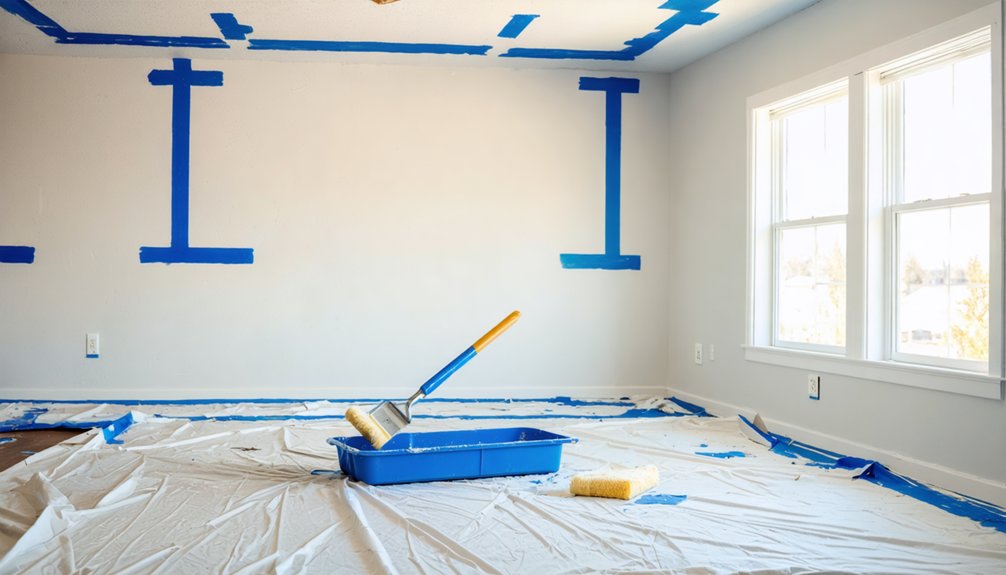
Mastering the Art of Taping and Masking
We’ll start with tape selection—choosing the right painter’s tape makes the difference between crisp lines and bleed-through on your Declo project. For most interior applications, we recommend green FrogTape with natural rubber adhesive for trim, windows, and baseboards, while standard blue tape works for less critical areas.
Before applying any tape, we’ll address gaps and imperfections with a bead of caulk along the edges, creating a sealed barrier that prevents paint from creeping beneath the tape line.
Choosing the Right Tape
Selecting the appropriate painter’s tape directly determines whether you’ll achieve crisp paint lines or spend hours scraping adhesive residue from your Declo home’s surfaces. We recommend matching tape selection to your specific application requirements.
For freshly painted drywall (1-7 days old), yellow delicate surface tape prevents damage during tape removal. Standard blue painter’s tape handles fully cured surfaces, trim, and baseboards effectively for up to 8 days. When working with textured walls, FrogTape’s PaintBlock technology seals paint edges better than conventional options.
Our professional tape selection guidelines:
- Use delicate surface formulations (yellow or purple) on wallpaper and newly painted walls
- Choose green multi-surface tape for extended projects requiring 14-21 day clean removal windows
- Apply proper pressure during installation—inadequate pressing causes failure regardless of tape quality
Sealing Edges With Caulk
Professional paint lines require more than quality tape—caulking separates amateur results from seamless finishes that withstand Declo’s temperature fluctuations. We’ll apply acrylic latex caulk along trim edges after masking, cutting the tube tip at a 45-degree angle for precise bead control. Consistent gun pressure creates uniform finish appearance while filling quarter-inch gaps between baseboards and walls.
We’ll smooth the bead immediately using a dampened finger or tool, pressing caulk firmly into joints before excess sets. This technique eliminates voids that compromise paint line sharpness. After tooling, we’ll remove the painter’s tape while caulk remains wet, pulling downward at a 45-degree angle.
The caulk requires 30 minutes to 24 hours curing time before painting. We’ll apply two paint coats over sealed edges for professional-grade results.
The Correct Sequence for Painting Interior Rooms
We always begin with ceiling coverage to prevent overspray and drips from contaminating subsequent surfaces.
After ceiling coats cure, we tackle all trim, doors, and cabinetry using back-sealing techniques that create razor-sharp paint lines for wall application.
Once trim work is complete, we roll wall coats from top to bottom in systematic sections, ensuring each surface receives proper coverage without overlap conflicts.
Trim Before Walls Always
When painting an interior room, most professional painters kick off the process by applying paint to all trim components—baseboards, door casings, window frames, and crown molding—before touching the walls. This industry-standard approach simplifies your workflow because addressing trim first allows you to correct any overspray or brush mistakes when you apply wall paint later.
We’ve found that cutting in trim proves considerably easier than taping off walls, and the semi-gloss finish typically used on trim creates a forgiving surface for corrections.
Key advantages of this sequence:
- Taping trim edges delivers crisp, professional lines when cutting in walls against finished woodwork
- Faster completion of detailed brushwork before tackling large wall surfaces with rollers
- Wall paint easily covers any trim paint splatter, eliminating touch-up work on baseboards and casings
Ceiling Then Wall Coats
After completing your trim work, the ceiling demands attention before any wall receives paint. We follow this sequence because gravity works in our favor—drips fall away from finished surfaces rather than marring them. When spray painting ceiling applications, we guarantee proper ventilation and adequate masking. The drying time importance can’t be overstated: we wait a full 24 hours before advancing to walls, preventing adhesion failures and tacky interference.
We apply flat or low-luster formulations to ceilings, minimizing light reflection while concealing imperfections. Extension poles paired with appropriate nap rollers deliver uniform coverage across the plane. Once cured, we tape ceiling edges for clean demarcation lines.
Wall application follows with cut-in work preceding roller coverage in W-patterns. This top-down methodology eliminates rework, delivers professional-grade results, and positions us for seamless project completion.
Essential Tools Every Declo Homeowner Should Have
Professional-grade tools form the foundation of any successful interior painting project, whether you’re revitalizing, rejuvenating, or restoring a single room or tackling your entire Declo home. We recommend investing in quality paintbrushes with synthetic bristles for latex paints—a 2.5-inch angle sash brush handles trim and corners with precision. Superior roller systems require a 9-inch frame with microfiber covers and appropriate nap lengths: 3/8-inch for smooth drywall, 3/4-inch for textured surfaces.
Quality tools separate amateur paint jobs from professional finishes—invest in proper brushes, rollers, and preparation equipment for lasting results.
Essential equipment includes:
- Surface preparation tools: spackle, filling knives, and 180-220 grit sanding sponges for smooth repairs
- Protection materials: painter’s tape and canvas drop cloths shield floors and fixtures
- Accessories: paint trays with liners, extension poles, and weight-rated ladders guarantee efficient application
These fundamentals promise professional results throughout your home.
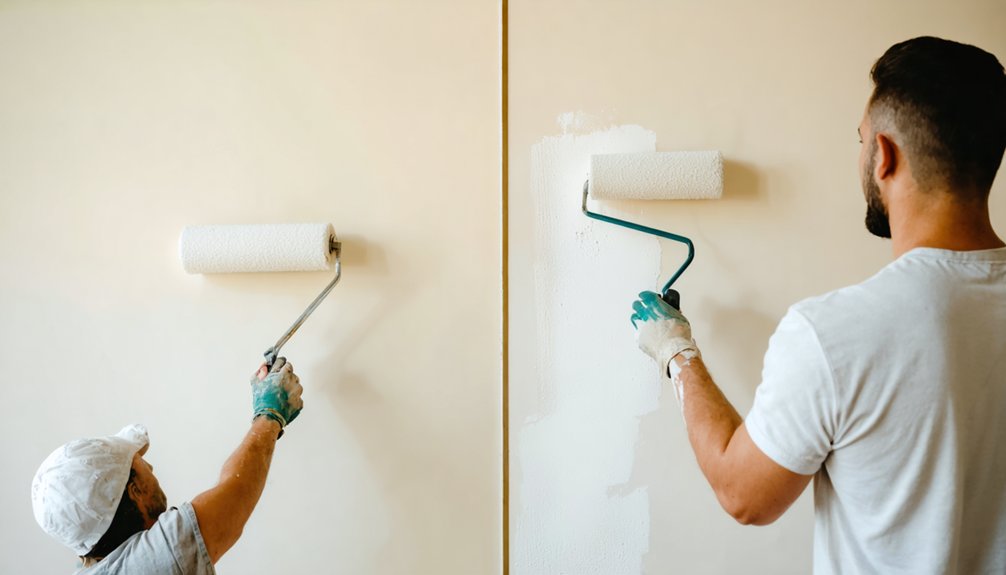
Achieving Full Coverage With Proper Coat Application

Quality tools deliver results only when paired with systematic coating methodology that maximizes coverage while minimizing material waste. We’ve found that using the right roller nap—3/8-inch for smooth surfaces, 1/2-inch for textured walls—dramatically reduces required passes and eliminates application frustration.
Our two-coat standard applies to most interior projects, though dramatic color changes demand a third coat. For bold hues like red or yellow, we plan for 4-5 applications. The industry benchmark remains consistent: primer plus two finish coats.
Maintaining consistent roller pressure prevents streaking while ensuring uniform distribution. We execute large “N” patterns, followed by sideways smoothing and vertical evening strokes. First coats progress from main areas toward edges; second coats reverse this sequence, preserving wet edges to eliminate hatband effects. Allow 2-4 hours between applications for ideal adhesion.
Sealing Tape Edges With Caulking for Sharp Lines
While most painters rely solely on tape for crisp lines, we’ve discovered that back-caulking transforms adequate results into professional-grade edges.
Proper caulk selection starts with choosing clear sealant or accelerator caulk for faster drying times. We apply a tiny bead directly into the dime-size gap between our tape and trim, focusing on the tape’s edge where paint bleeds typically occur.
Effective caulk application techniques require precise execution:
- Use a wet finger at an angle to tool excess caulk away, creating a straight seal
- Work in small sections since caulk sets quickly to touch
- Paint immediately after smoothing while the seal remains fresh
We’ve found this method creates an impenetrable barrier against paint seepage. Remove tape while paint’s still wet for those razor-sharp lines that distinguish professional work from amateur attempts.
Rolling vs. Spraying: Choosing the Best Method for Your Project
Rollers offer superior control for occupied homes in Declo, setting up in under one minute with minimal preparation. They provide richer color saturation through thicker coats and eliminate overspray concerns.
We recommend sprayers for cabinets and textured surfaces where smooth, brushstroke-free finishes matter most. For standard walls and ceilings, rollers remain the practical choice—especially when you’re managing budget constraints and working in furnished spaces.
Temperature Considerations for Interior Painting in Idaho
We’ll examine three critical factors that determine paint adhesion and cure rates during Idaho winters: minimum temperature thresholds, climate-specific challenges, and indoor environmental controls.
Preserving substrate and ambient temperatures between 50-85°F guarantees proper film formation and molecular bonding regardless of exterior conditions. Understanding these parameters prevents common failures like poor adhesion, extended cure times, and surface defects that compromise your finished application.
Minimum Temperature Requirements
Temperature thresholds dictate paint performance more than any other environmental factor during interior application. We maintain strict paint application temperatures to guarantee proper curing and adhesion in your Declo home. Latex formulas require minimums of 50°F, while oil-based paints tolerate 40°F. We monitor ambient humidity levels between 40-70% for ideal drying conditions.
Critical temperature parameters we follow:
- Latex paints: 50-85°F range prevents bumps, blisters, and incomplete bonding
- Oil-based formulas: 40-90°F spectrum avoids cracking, fading, and discoloration
- Post-application control: Sustain temperatures above minimums for 36 hours after coating
We’ll use space heaters in cooler rooms and seal drafts to prevent temperature drops. Cold conditions below these thresholds halt the drying process entirely, causing peeling, lifting, and bubbles that compromise your investment.
Winter Painting Challenges
Idaho’s winter conditions introduce specific complications that extend beyond basic temperature monitoring. We’re dealing with condensation management when warm interior air contacts cold window surfaces and exterior walls. This moisture buildup compromises paint adhesion, making dehumidifiers essential in our workspace.
Draft prevention requires sealing gaps around openings with weather stripping before we begin application work.
Our ventilation strategies must adapt since we can’t open windows during cold months. We’ll use fans to circulate air and maintain cross-ventilation between rooms, particularly when working with solvent-based products.
Tool and material selection becomes critical—we need space heaters for temperature consistency, high-quality application tools, and coatings formulated for 50°F to 85°F ranges. Proper wall preparation addresses dust accumulation that winter’s static electricity intensifies.
Optimal Indoor Climate Control
Since paint chemistry relies on molecular bonding that temperature directly governs, we must establish precise climate parameters before opening a single can. We’ll target 60°F to 75°F for both room air and wall surfaces—latex demands this range for proper film formation, while oil-based tolerates 40°F to 90°F but performs best within tighter bounds.
Climate control essentials:
- Temperature stability: Deploy space heaters in cold rooms and verify surface temps match ambient conditions
- Maintaining humidity levels: Keep relative humidity between 40% and 70% using weather trackers; Idaho’s winter dryness typically aids curing
- Utilizing proper ventilation: Crack windows strategically and position fans to expel VOCs without introducing cold drafts
Seal perimeter gaps with weather stripping. Low-VOC formulations minimize odor concerns in controlled environments.
Protecting Switch Plates and Outlets During Your Paint Job
Proper switch plate and outlet protection requires systematic execution of three critical protocols: complete power shutdown, surface preparation, and barrier installation. We’ll turn off power at the circuit breaker before unscrewing cover plates, then clean them with detergent to eliminate grease and oils.
For color changes, we’ll apply primer and allow complete drying. SmartGuard paint shields and Pro Painting Products covers fit duplex, Decora, GFCI outlets, and toggle switches—eliminating masking tape while protecting against paint, mud, and debris. These reusable shields cost $30.88-$37.25 per 25-count pack and streamline our workflow.
We’ll insert cardboard into outlet openings as barriers and push screws through for thread painting. Between storing paint brushes and cleaning paint sprayers, we’ll paint behind plates for professional results without visible dams.
Common Mistakes to Avoid When Painting Interior Spaces
While interior painting appears straightforward, we’ve identified five critical error categories that consistently compromise project outcomes for Declo homeowners: surface preparation failures, paint selection missteps, application technique deficiencies, inadequate tool specifications, and timing miscalculations.
Managing existing paint conditions requires thorough surface cleaning and defect remediation before application. Neglecting this foundation allows adhesion failures and magnified imperfections. Match paint finishes to room functionality—satin for kitchens, flat for living spaces. Ensuring proper lighting levels prevents undetected coverage gaps during application.
Critical Implementation Standards:
- Apply consistent roller pressure using appropriate nap lengths for surface texture
- Allow complete inter-coat drying periods to prevent streaking and delamination
- Begin application at corners, maintaining wet edges to eliminate lap marks
Low-quality tools generate fiber contamination and uneven distribution, ultimately requiring remediation.
Frequently Asked Questions
How Long Should I Wait Between Applying the First and Second Coats?
We recommend waiting 2–4 hours between coats for latex paint, ensuring proper drying time. We’ll check paint consistency and surface tackiness before recoating. For oil-based formulations, we always wait the full 24 hours.
What Sheen Level Works Best for Different Rooms in My Home?
We’ve tested every sheen imaginable! For your home, we recommend satin finish for high traffic areas like kitchens and hallways, while flat sheen for ceilings minimizes imperfections. Eggshell works perfectly for bedrooms and living spaces.
How Do I Choose the Right Paint Color for Small Spaces?
We’ll select light neutrals or cool pastels with high LRV values for your compact rooms. Consider lighting conditions—north-facing spaces need warm tones, while south-facing benefit from cooler hues. We always consult color palettes ensuring undertones flow seamlessly throughout.
Can I Paint Over Wallpaper or Must I Remove It First?
We’ll level with you—while painting over wallpaper *seems* genius, we strongly recommend removal after conducting a patch test adhesion. Always test for wallpaper removal first; proper surface preparation guarantees professional results and prevents future headaches for our community.
What’s the Best Way to Clean Paint Brushes and Rollers Afterward?
We’ll remove excess paint first, then clean with appropriate solvent—soap for latex, spirits for oil-based. Proper brush cleaning technique requires thorough rinsing and reshaping. Effective paint roller storage means spinning dry and storing flat in cool conditions.