We achieve professional trim results by starting with thorough surface prep—vacuuming, cleaning with dish soap solution, and sanding with 120-grit to eliminate shine. We’ll apply quality painter’s tape, prime bare wood with tinted oil-based primer, then build multiple thin coats using a 2-inch angled sash brush. We remove tape at 45 degrees while paint’s still wet, allowing 6-8 hours between coats for latex enamels. Our systematic approach below covers advanced techniques that elevate your finish quality.
Key Takeaways
- Clean, sand, and repair baseboards before painting to ensure proper paint adhesion and smooth results.
- Apply oil-based primer on bare wood and patched areas, allowing complete drying before topcoats.
- Use quality painter’s tape along edges, sealing with caulk to prevent paint bleed for crisp lines.
- Apply minimum two thin finish coats over primer, waiting 6-8 hours between coats for durability.
- Remove tape at 45-degree angle while paint is wet to prevent cracking and achieve professional edges.
Gather Your Tools and Materials
Every successful trim painting project starts with the right tools—not just any brushes and tape, but the specific equipment that delivers professional results. We’ll need a 2-inch angled sash brush for cutting in edges and a quality green painter’s tape for proper masking technique around baseboards and door frames. Drop cloths protect our workspace while preserving surface integrity beneath.
Our kit includes fine sanding blocks (220-grit works best), tack cloth for dust removal, and a 5-in-1 tool for surface prep. A painter’s tray with liner keeps paint accessible, while mineral spirits stand ready for cleanup. Don’t forget the caulk gun—sealing trim joints before painting prevents future cracks. Extension poles eliminate unnecessary ladder work, and a hand masker dramatically speeds up our taping process.
Clean and Prepare the Surface
With our tools assembled, we’ll tackle surface preparation—the foundation that determines paint adhesion and finish quality. Start by vacuuming baseboards with a brush attachment to remove built up dirt, cobwebs, and loose particles. Follow with a damp sponge and dish soap solution, wiping the full length while targeting grooves and trim details.
For stubborn grime, use the rough side of your sponge—avoid ammonia-based products that compromise adhesion. Check for moisture damage before proceeding. Once clean and dry, lightly sand with 120-grit sandpaper to eliminate shine and create tooth for primer. Vacuum thoroughly, then wipe with a tack cloth.
Apply painter’s tape along edges to protect adjacent surfaces. This methodical approach guarantees professional-grade results.
Repair Damage and Imperfections
Before we prime and paint, we’ll need to address any damage that’ll telegraph through the finish coat.
We’re focusing on three critical repair tasks: sanding down rough spots and old paint drips, filling gaps between the trim and wall with caulk, and rebuilding sections where the profile’s been chipped or damaged.
These repairs create the smooth, professional surface that separates a quick paint job from quality trim work.
Sand Rough Problem Areas
Rough trim surfaces demand systematic sanding to create a paintable foundation, starting with coarse-grit paper and progressing through finer grits. We’ll perform initial scraping with profile-matched tools—convex scrapers for round-overs, concave for dishes, and flat for straight surfaces. This preserves molding integrity before touching sandpaper to wood.
Begin with 80-grit on severely worn areas, then progress through 100-grit for heavy removal. After scraping, we’ll start at 150-grit and maintain consistent sanding patterns with the grain direction. Use sanding blocks on flat surfaces to preserve crisp edges, while folded paper tackles fillets and tight spots.
Match foam grips to curve radius for controlled results. We’ll finish with 220-grit for ideal paint adhesion, wiping dust with tack cloth. The fingernail test confirms smoothness across splices and profiles.
Fill Gaps With Caulk
Old caulk compromises new applications through bond failure, so we’ll strip every trace from existing joints before loading our gun. We’ll press our removal tool‘s pointed end into each seam, pull through the entire length, then flip to the flat edge for surface scraping. After vacuuming thoroughly, we’ll wipe non-porous surfaces with alcohol.
We’ll apply 1-inch blue painter’s tape along both gap sides, pressing edges down firmly to seal surface gaps and prevent bleed-under. Position tape where baseboard meets floor, molding to contours.
Cut the nozzle at 45 degrees—start at 1/8 inch. We’ll hold our gun flat against the base, working 2-to-3-foot sections to conceal joint imperfections. After smoothing each bead with a wet finger, we’ll pull tape immediately at an angle for sharp lines.
Rebuild Damaged Trim Profiles
Fresh caulk seals gaps, but deeper structural problems demand a different approach. When trim shows chips, cracks, or missing sections—especially from water exposure—we’ll rebuild those profiles with filler.
First, assess the damage. Measure gaps and examine contoured areas needing precise matching. Remove loose material with a utility knife or oscillating tool, using undamaged sections as templates.
Apply filler in gradual layers, pressing it into voids with a putty knife. Match existing grooves and contours carefully. Let it harden overnight.
Sand strategically: 150-grit for flat sections, 120-grit for shaping precise profiles, then 600-grit for fine details. Cut custom sandpaper shapes for complex profiles. We’re targeting 85-100% profile match.
Prime, then paint with durable trim coating. Proper water exposure prevention starts here—making repairs that outlast most factory miters.
Apply Tape and Protect Adjacent Surfaces

Before we load our brushes, proper taping creates the foundation for professional-looking trim work. We’ll select yellow painter’s tape for walls and green multi-surface tape for floors—this combination prevents damage while maintaining paint bleed prevention. Apply tape along edges, sealing firmly with your fingernail or credit card.
Our professional taping sequence:
- Pull 6-8 inches at a time, keeping the roll flat against surfaces while maintaining tape tension for straight lines
- Embed tape thoroughly using back-and-forth hand motions with a 5-in-1 putty knife
- Apply clear latex caulk along the tape-trim junction to seal microscopic gaps
We’ll remove tape while paint remains wet, pulling at an angle. Never leave tape through multiple coats—dried paint creates adhesion nightmares we’d rather avoid.
Prime Bare Wood and Patched Areas
Once we’ve secured our tape lines, priming creates the foundation that determines our finish quality. For interior trim work, we’ll reach for oil-based primers on bare wood—their superior sealing properties outperform water-based alternatives. Zinsser Shellac Primer excels on raw wood and MDF, preventing grain raise while ensuring smooth coverage.
Our primer selection considerations include tinting to match topcoat color when making dramatic changes. We’ll apply with a 3-inch China bristle brush for oil-based products, working in manageable 2-3 foot sections. Jam those bristles into corners and gaps—full coverage matters here. For patched areas, we’ve already filled and sanded flush; now we seal everything uniformly.
One coat suffices for baseboards and trim. We’ll let it dry completely before applying our planned 2-3 topcoats for professional durability.
Master the Brush Application Technique
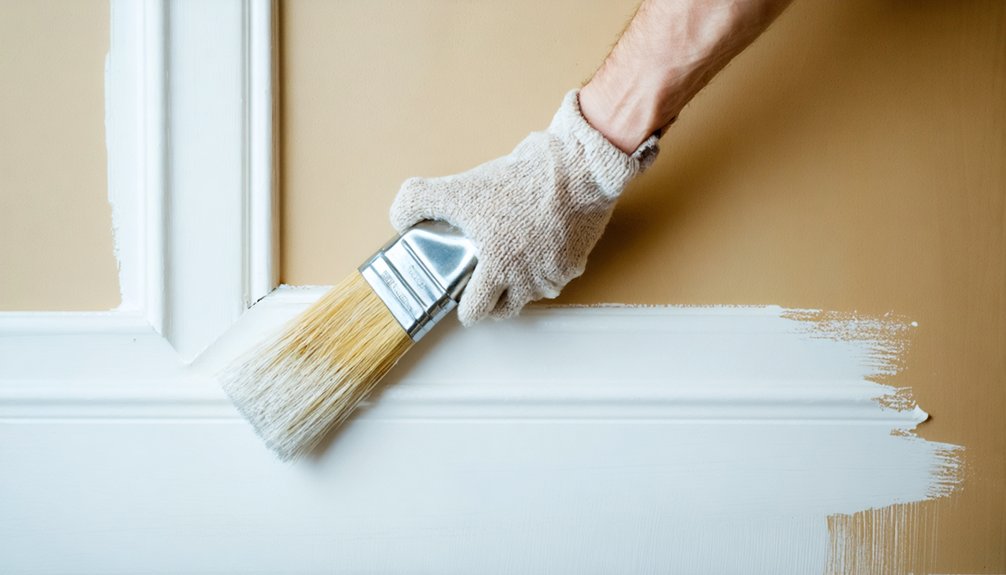
Proper brush technique separates amateur finishes from professional results—the difference lies in our loading method and stroke discipline.
Mastering paint loading and controlled strokes transforms basic application into professional-grade results that last.
Angled brush selection starts with our go-to: Purdy’s 2.5-inch Nylox. Its soft bristles minimize stroke lines while maintaining cut-in precision. Before we load paint, we wet the bristles and spin out excess water—this primes for even adherence and simplifies cleanup.
Our paint loading techniques follow strict protocol:
- Dip lightly with heavy pressure strokes—keep paint below the ferrule to prevent bristle damage
- Apply thin layers lengthwise with the grain—coverage happens in passes, not single thick coats
- Finish with feathered strokes from dry to wet—lift where paint tacks to avoid disrupting self-leveling
We add Floetrol to latex paints for superior flow. Self-leveling formulas like Sherwin-Williams Pro Classic further reduce visible brush marks, delivering that factory-smooth finish we’re after.
Apply Multiple Coats for Durability
We’ll apply a minimum of two top coats over your primer to achieve professional-grade durability and finish quality. Each coat must dry completely—typically 4-6 hours for latex paint—before applying the next layer to prevent lifting or wrinkling.
This multi-coat system builds protective layers that resist wear and moisture while developing the rich color depth and smooth texture that distinguishes quality trim work.
Two Coats Recommended
Professional-grade trim work requires a minimum of two finish coats over primer to achieve the durability and appearance that separates amateur jobs from polished installations. We’ve found that this standard applies universally across pre-primed MDF and raw wood baseboards, where enhanced coverage and uniform sheen define quality craftsmanship.
Two coats deliver measurable advantages:
- Moisture resistance: Waterborne alkyd formulations withstand seasonal expansion and climate stress through proper layering
- Color depth: Multiple applications build pure white saturation and eliminate streaking common in single-coat shortcuts
- Surface longevity: Semi-gloss and gloss finishes become wipeable barriers against scuffs, dust accumulation, and high-traffic wear
Premium paints maximize their protective properties through this layering approach, creating surfaces that maintain their polished appearance for years with minimal touch-ups required.
Drying Time Between Coats
Applying multiple coats demands strategic timing—rush the process and you’ll compromise adhesion, wait too long and you’re wasting billable hours. For latex trim enamels, we’re looking at 6-8 hours minimum between coats, though 24 hours gives us prime hardness.
Oil-based formulas aren’t negotiable—that’s a full 24-hour window for proper solvent evaporation.
Dry time requirements shift with your working conditions. High humidity or cold temps can double our wait times, creating tacky surfaces that telegraph brush marks straight through topcoats.
We maintain 65-75°F with active ventilation—fans and dehumidifiers aren’t luxuries, they’re tools that keep schedules tight.
Seasonal climate effects hit hardest in summer humidity and winter cold. Check your manufacturer specs, but budget extra time when conditions aren’t ideal.
Thin, even coats always outperform thick applications rushing coverage.
Remove Tape and Complete Final Touches
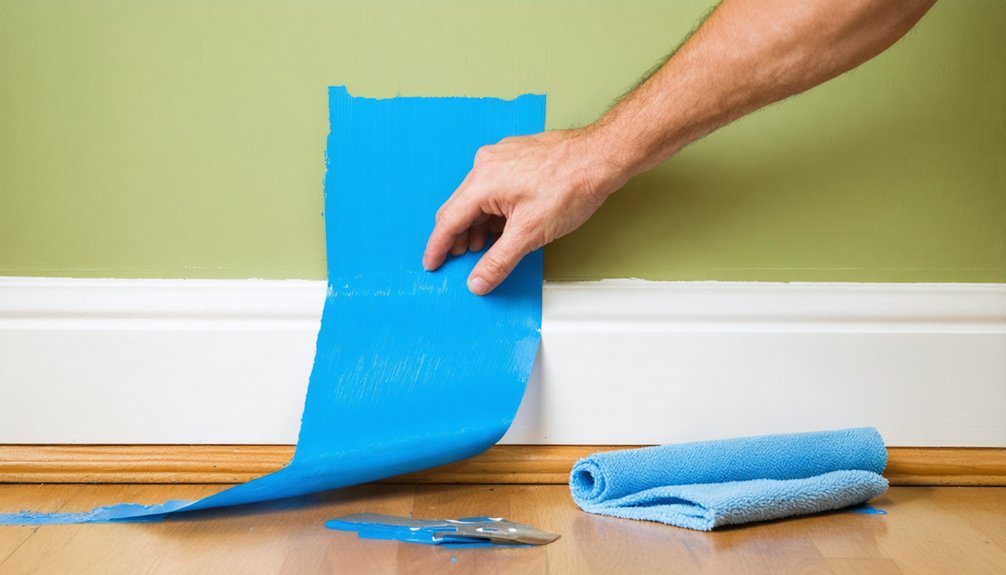
Once you’ve completed your final brush strokes, pull the painter’s tape at a 45-degree angle while the paint remains wet. This wet paint maintenance technique prevents the finish from hardening along tape edges, which causes cracking and peeling. Roll the removed tape inward to contain wet paint and maintain a clean workspace.
Essential final touch procedures:
- Apply light sanding with 120-grit sandpaper to smooth any remaining brush strokes or drips from primer coats
- Store leftover trim paint in a small labeled jar with the brush resting on the jar’s sides to prevent lid contamination
- Place newspaper beneath work areas during touch-ups to catch drips without full floor protection
For effective touch up procedures, we’ll address small imperfections using precise brush placement rather than re-taping entire sections. Multiple thin coats consistently outperform single thick applications for professional-quality results.
Frequently Asked Questions
How Long Should I Wait Between Coats When Painting Trim?
We’ll wait two hours between coats for ideal drying time. Trim paint viscosity considerations matter—thicker formulations need longer. We’re ensuring proper adhesion and professional results by letting each coat cure completely before applying the next layer.
Can I Paint Over Stained or Varnished Trim Without Sanding?
Yes, we can paint over varnished trim without sanding using deglosser and a prime coat required for adhesion. We’d recommend oil-based paint recommendations like Kilz Original or BIN shellac primer for professional-grade results on your project.
What’s the Best Way to Store Leftover Trim Paint for Touch-Ups?
We’ll transfer leftover trim paint to airtight containers, preferably plastic for water-based finishes. Label contents with color, sheen, brand, and date. Store in cool, stable temperatures. Clean the rim thoroughly before sealing to maximize shelf life for future touch-ups.
Should I Paint Trim Before or After Painting Walls?
We recommend painting trim first—it’s foundational among DIY trim painting tips. You’ll achieve cleaner lines and protect your trim color selection when rolling walls later. This pro sequence lets us fix wall splatters without compromising your finished trim work.
How Do I Prevent Brush Marks From Showing on Finished Trim?
we minimize brush stroke visibility by using high quality paint brushes, maintaining proper bristle loading, painting with the wood grain, avoiding over-brushing beyond 2-3 passes, and selecting premium self-leveling paints.