We’ve perfected exterior painting across Paul’s demanding high-desert climate through systematic surface preparation: pressure-washing at 2,500-3,000 PSI, scraping loose paint with tungsten-carbide blades, and maintaining wood moisture below 15%. We exclusively use airless spray systems with proper back-rolling techniques, applying 100% acrylic latex in two coats during fall’s ideal 50-85°F temperature window. Our process addresses fiber cement, wood siding, and metal surfaces with material-specific primers and multi-pass applications. The following sections detail our proven methodology for achieving factory-quality finishes that withstand Idaho’s extreme UV exposure and temperature fluctuations.
Key Takeaways
- Pressure wash and scrape loose paint, then prime bare wood while maintaining moisture content below 15% for proper adhesion.
- Paint during Idaho’s mild seasons when temperatures stay between 50-85°F with low humidity to prevent blistering and peeling.
- Use airless sprayers at 2,500-3,000 PSI with 12-inch distance and back roll all sections for even coverage.
- Choose fiber cement siding for superior durability against Idaho’s climate extremes, resisting warping and requiring less maintenance than wood.
- Apply two coats of 100% acrylic latex paint with 4-6 hours between applications, working trim first then top-down.
Preparing Your Home’s Exterior for a Fresh Coat of Paint
Before applying the first brushstroke, we’ll need to establish a proper foundation through systematic surface preparation. We’ll start by donning essential protective gear—safety glasses, dust masks, and gloves—before beginning any scraping or sanding activities.
Our proper surface preparation techniques begin with pressure washing to eliminate grime, mildew, and dirt. For stubborn mold, we’ll apply a bleach solution (one part bleach to three parts water), scrub thoroughly, and rinse completely. Next, we’ll scrape loose, peeling paint using tungsten-carbide-blade scrapers, then feather-sand edges down to bare wood.
We’ll maintain wood moisture content stays below 15% before proceeding. After spot-priming sanded areas and repairing surface flaws with exterior-rated compounds, we’re ready to prime bare substrates. These paint application methods guarantee optimal adhesion and longevity.
Understanding Different Siding Materials in Paul, Idaho
We’ll examine how Paul’s climate affects three distinct siding materials that require different painting approaches and maintenance protocols.
Fiber cement’s dimensional stability makes it ideal for long-term paint adhesion, while wood siding demands moisture management and regular recoating to prevent rot and insect damage.
Stucco surfaces need specialized primer systems and application techniques to guarantee proper bonding and prevent moisture intrusion through the substrate.
Fiber Cement Durability Benefits
Fiber cement siding delivers exceptional durability through its engineered high-density composition, which withstands Paul, Idaho’s harsh environmental conditions including freezing temperatures, heavy winds, and intense sun exposure. We’ve found this material resists warping, cracking, splitting, and fading—common failures we see in vinyl and wood alternatives. Its extreme weather performance extends your home’s lifespan up to 50 years with proper maintenance protocols.
The fire safety advantages merit serious consideration. This non-combustible material earned a Class A fire rating, providing critical protection against direct flame exposure and wildfire risks. We recommend it for homes in fire-prone zones where insurance companies recognize its superior safety profile.
Additionally, the material’s composition deters termites, carpenter ants, and woodpeckers, eliminating pest-related vulnerabilities that compromise structural integrity in traditional wood siding systems.
Wood Siding Maintenance Needs
While wood siding delivers authentic aesthetics that homeowners value, it demands rigorous maintenance protocols that directly impact its functional lifespan in Paul, Idaho’s climate. We’ll need to implement extensive moisture management strategies, including annual inspections and immediate remediation of flaking paint that compromises water barriers.
Repainting cycles occur every 3-5 years to protect against UV degradation and elemental exposure. Natural finishing techniques utilizing stains and penetrating oils prove essential for stabilizing cedar and pine substrates. We must maintain proper clearance—18-20 inches from vegetation—to guarantee warranty compliance and prevent moisture retention.
Regular cleaning removes mildew and debris that accelerate deterioration. When we commit to these protocols, wood siding achieves its 20-40 year service life expectancy while preserving the authentic character our community values.
Stucco Paint Application Techniques
Stucco surfaces present distinct application requirements that demand specialized equipment configurations and multi-pass coating strategies to achieve complete coverage across their heavily textured profiles. We’ll spray with a 515 Rackex tip at multiple angles—straight on, sideways, upward—guaranteeing paint penetrates peaks and valleys.
Back rolling with 3/4-inch nap rollers forces material into porous surfaces, critical for shallow textures. Sherwin-Williams Super Paint flat remains our standard choice, though matching primer selection ascertains proper adhesion on bare stucco. High heat paint options protect south-facing exposures.
We’ll caulk seams where stucco meets dissimilar materials and mask windows with frog tape. Expect 2-3 times more material consumption than flat siding. Each angle coat must dry before subsequent passes, preventing runs while maximizing texture fill.
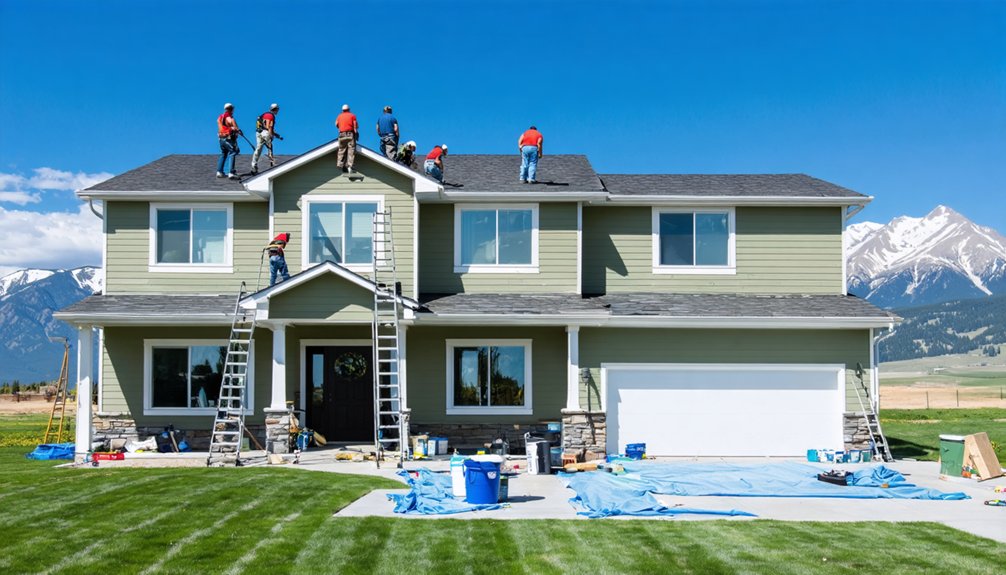
Professional Spraying and Rolling Methods for Lasting Results
We employ airless spray systems calibrated to 2,500-3,000 PSI for ideal atomization of exterior coatings, ensuring uniform mil thickness across all substrates. Our technicians maintain a consistent 12-inch spray distance with overlapping passes at 50% to eliminate streaking and achieve complete coverage on siding surfaces.
We immediately back roll all sprayed sections while the paint remains wet, mechanically forcing the coating into surface pores and texture for superior adhesion that withstands Paul’s temperature extremes and UV exposure.
Spray Equipment and Techniques
Professional-grade airless paint sprayers form the backbone of efficient exterior painting operations, delivering between half a gallon to two gallons of material per minute across large surface areas. We’ll need a complete setup: 50 feet of spray line, appropriate gun, and 515 or 517 tips for latex applications. Paint viscosity control starts with proper straining through filter bags before filling buckets two-thirds full.
Our spraying application techniques require maintaining the nozzle 6-8 inches from surfaces, keeping it perpendicular throughout each pass. We trigger before reaching the surface and release after, ensuring continuous arm motion prevents streaking. Working in indirect sunlight avoids lap marks and blistering. We always start with eave undersides, cut in corners and windows, then spray lengthwise patterns from top to bottom for consistent coverage.
Back Rolling for Adhesion
Why does spraying alone often fail to provide adequate adhesion on porous exterior surfaces? We’ve found that airless sprayers can bridge voids and pinholes without penetrating deeply into substrates like stucco, siding, and wood decks. That’s where back rolling becomes essential for efficient application and long term benefits.
We apply back rolling immediately after spraying while paint remains wet, forcing coating into every gap and crack. This prevents future separation from Paul’s temperature fluctuations.
Our required back rolling surfaces include:
- Stucco and exterior siding (use Koda Wool rollers)
- Fences and decks (apply with Deck Boss brushes)
- New drywall with PVA primer
- Previously damaged areas after proper preparation
We skip back rolling on metal surfaces and trim requiring smooth finishes, as it creates unwanted stippled texture instead.
Essential Tools and Supplies for Exterior Painting Projects
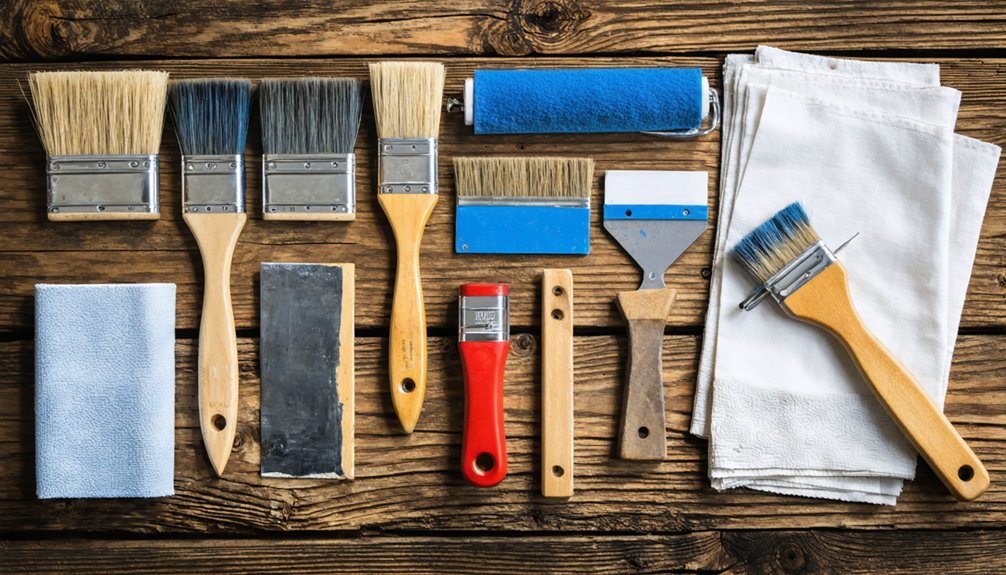
Before tackling any exterior painting project in Paul, Idaho, you’ll need to assemble the right arsenal of professional tools and supplies. We recommend contractor-grade roller frames paired with 9-inch microfiber or polyester covers—these prevent warping during extended wall coverage. For cutting work, 3-inch angled sash brushes like Premier Montauk models deliver superior corner control compared to flat alternatives.
Your paint tray organization system should include one-gallon metal pans for durability and efficient distribution. We’ve found that 3M Hand Masker tools dramatically reduce masking time, while FrogTape guarantees clean edge definition on trim and siding.
For optimal brush cleaning and longevity, invest in high-quality bristle construction that resists shedding. Don’t overlook safety essentials: drop cloths, extension poles, and dripless caulking guns with integrated cutting blades complete your professional setup.
Why Fall Is the Best Season for Exterior Painting in Idaho
When exterior painting projects succeed or fail in Idaho’s climate, timing often determines the outcome more than technique or materials. We’ve found fall consistently delivers favorable conditions for Paul-area applications.
September through October provides the technical advantages our projects demand:
- Temperature stability: 50-85°F prevents flash drying and guarantees proper cure cycles
- Reduced humidity: Minimizes blistering, peeling, and moisture-related adhesion failures
- Lower precipitation: Stable weather windows reduce project interruptions
- Enhanced durability: Controlled curing strengthens winter weather resistance
These conditions translate to improved productivity for our crews and cost savings through fewer defects. The 60-80°F comfort range supports precise application while protecting surfaces before Idaho’s harsh winters arrive. We’re completing projects with professional-grade finishes that withstand extreme seasonal exposure.
Step-by-Step Process for a 3500 Square Foot Home
Our systematic approach to painting a 3500 square foot home begins with accurate material calculations that guarantee costly delays and waste don’t occur. We determine gallons needed by dividing total square footage by coverage rate—typically 250-350 sq ft per gallon for two coats. Your home requires 20-28 gallons, plus 10-15% extra for complex architectural features.
We never recommend cutting corners during preparation. Our process includes pressure-washing, allowing 24-48 hours drying time, scraping loose paint, and repairing damaged surfaces with exterior-grade filler. We prime bare wood and repaired areas for proper adhesion. Calculating material needs precisely verifies we’ve sufficient primer, caulk, and paint on-site.
We paint trim first, then work top-down using rollers and brushes, applying two coats with 4-6 hours between applications.
Achieving Factory-Quality Finishes on Gutters and Fascia
Factory-quality finishes on gutters and fascia require meticulous surface preparation that differs markedly from standard siding work. We’ll guide you through achieving professional results that protect your Paul home’s exterior trim.
Proper gutter and fascia preparation ensures lasting protection—techniques that go beyond typical exterior painting methods.
Critical Preparation Steps:
- Wire-brush all loose paint and rust, then pressure-wash at low PSI
- Apply zinc-rich primer on galvanized steel, acrylic bonding primer on aluminum
- Sand lightly between coats for ideal adhesion
- Allow 24-48 hours drying time before topcoating
For maximizing paint coverage, we recommend airless spraying at 2000-2500 PSI, immediately back-brushing to level the finish. Minimizing brush marks requires thin coats of 10-15 mils wet film thickness. Apply 2-3 topcoats of 100% acrylic latex in semi-gloss finish, spacing applications 24 hours apart. This system delivers 5-10 year durability against Idaho’s climate extremes.
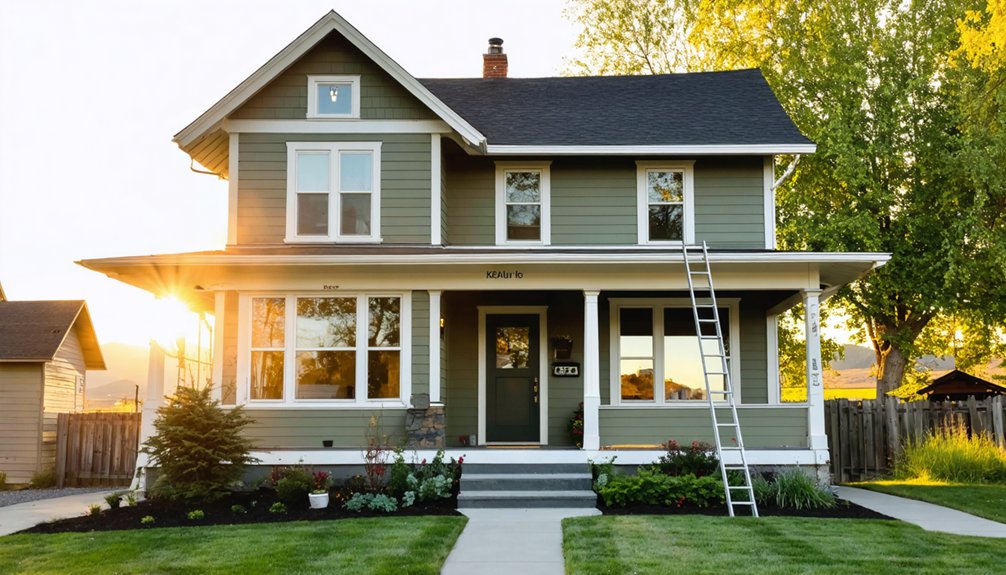
Transforming Your Home’s Curb Appeal With Color Updates
Because color selection directly impacts long-term coating performance and property valuation, we’ll address the technical framework for strategic palette development before surface application begins.
We’ll establish color coordination through architectural style alignment—craftsman profiles demand earthy palettes, while modern builds require bold charcoal-white contrasts. Your main body color, trim, and accent components must harmonize without exact matching. We recommend testing bold options on sample boards under varying light conditions before committing.
Weathering considerations factor heavily in Paul’s climate. Seasonal light shifts affect color perception year-round, requiring palette validation across different exposures. During prep, we’ll update ancillary elements—respraying house numbers bronze, refinishing hose reels in industrial white enamel. We’ll remove downspouts for complete coverage, back-rolling all spray applications to guarantee uniform film thickness and eliminate application marks.
Frequently Asked Questions
How Much Does It Cost to Paint a House Exterior in Paul, Idaho?
We’ll find exterior painting in Paul, Idaho costs $1.50–$4 per square foot on average. Local cost of labor and materials typically runs $2,900–$3,177 for standard homes, though we’ll adjust pricing based on your home’s specific square footage and condition.
Do I Need a Permit to Paint My Home’s Exterior in Paul?
We don’t need a building permit for exterior painting in Paul. However, we should verify local regulations regarding paint color choices if our home’s in a historic district or HOA-governed area before starting work.
How Long Will an Exterior Paint Job Last in Idaho’s Climate?
In Idaho’s harsh conditions, we’ll see your exterior paint last 5-7 years typically. Climate’s impact on longevity includes intense UV exposure and freeze-thaw cycles. Regional painting considerations require premium coatings that withstand our extreme temperature fluctuations safely.
Should I Hire a Professional or Paint My Home’s Exterior Myself?
We’d recommend hiring professionals unless you’ve mastered proper painting techniques. DIY challenges include multi-story access risks, surface preparation requirements, and weather timing. Professional contractors guarantee code compliance, structural safety, and warranty protection for our investment.
What Are the Best Paint Brands for Idaho Exterior Painting Projects?
We recommend Sherwin-Williams Duration, Benjamin Moore Aura, and Behr Marquee for Paul’s climate. Proper color selection and paint application techniques guarantee ideal adhesion and durability. These brands withstand Idaho’s temperature swings, UV exposure, and moisture challenges effectively.